Analyzer 概述
在文本处理中,Analyzer 是一个关键组件,用于将原始文本转换为结构化、可搜索的格式。每个 Analyzer 通常由两个核心元素组成:分词器和过滤器。它们共同将输入文本拆分为 token、对 token 进行处理,并为高效索引和检索做好准备。
在 Zilliz Cloud 中,创建 Collection 并向 Collection Schema 添加 VARCHAR 字段时,可以配置 Analyzer。Analyzer 生成的 token 可用于构建关键词匹配索引,也可以转换为稀疏 Embedding 以支持 Full text search。有关详细信息,请参阅 Full Text Search 或 Text Match。
使用 Analyzer 可能会影响性能:
-
Full text search:对于 Full text search,DataNode 和 QueryNode 通道的数据消费速度会变慢,因为它们必须等待分词完成。因此,新写入的数据需要更长时间才能用于搜索。
-
关键词匹配:对于关键词匹配,索引创建速度也会变慢,因为必须先完成分词才能构建索引。
Analyzer 的构成
Zilliz Cloud 中的 Analyzer 由且仅由一个分词器和零个或多个过滤器组成。
-
分词器:分词器将输入文本拆分为称为 token 的独立单元。根据分词器类型,这些 token 可以是单词或短语。
-
过滤器:过滤器可用于进一步处理 token,例如将其转换为小写或移除常见词。
分词器仅支持 UTF-8 格式。未来版本将支持其他格式。
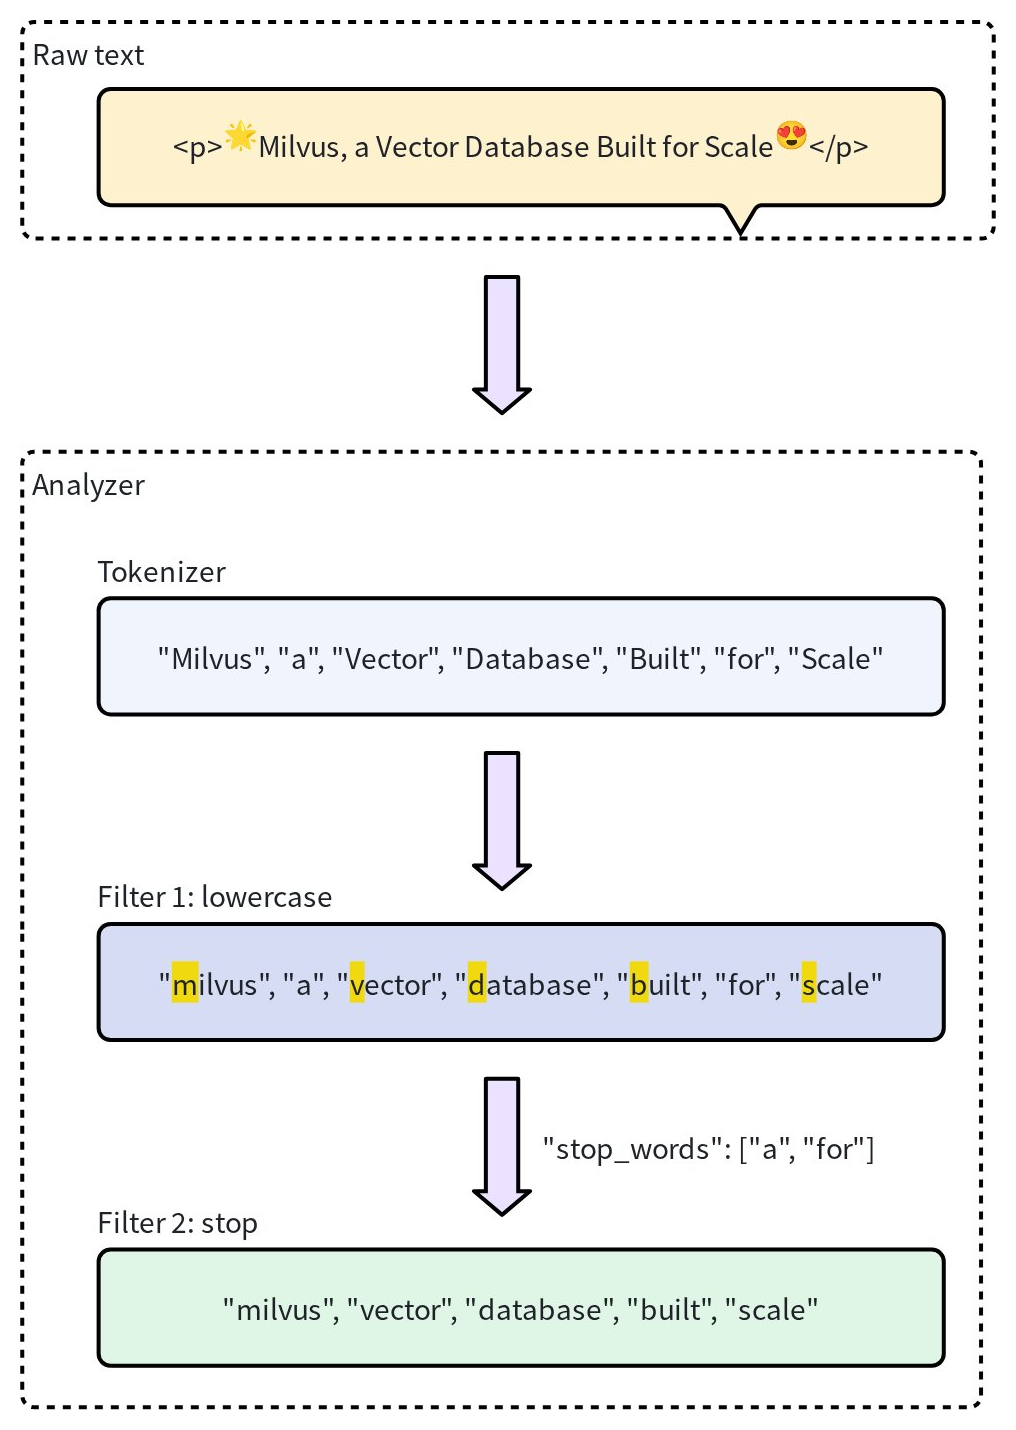
下图展示了 Analyzer 处理文本的工作流程。
Analyzer 类型
Zilliz Cloud 提供两类 Analyzer,以满足不同的文本处理需求:
-
内置 Analyzer:预定义配置,只需少量设置即可处理常见文本任务。内置 Analyzer 无需复杂配置,适合通用搜索场景。
-
自定义 Analyzer:对于更高级的需求,您可以通过指定分词器以及零个或多个过滤器来定义自己的配置。这种自定义方式特别适合需要精确控制文本处理流程的场景。
-
如果创建 Collection 时省略 Analyzer 配置,Zilliz Cloud 默认使用
standardAnalyzer 处理所有文本。有关详细信息,请参阅 Standard。 -
为了获得最佳搜索和 Query 性能,请选择与文本数据语言相匹配的 Analyzer。例如,
standardAnalyzer 用途广泛,但对于中文、日语或韩语等具有独特语法结构的语言,它可能并非最佳选择。在这种情况下,强烈建议使用chinese等特定语言的 Analyzer,或使用专用分词器\(例如lindera、icu\)和过滤器构建自定义 Analyzer,以确保准确分词并获得更好的搜索结果。
内置 Analyzer
Zilliz Cloud 集群中的内置 Analyzer 已预先配置特定的分词器和过滤器,无需自行定义这些组件即可直接使用。每个内置 Analyzer 都是一个模板,包含预设的分词器和过滤器,并提供可选参数用于自定义。
例如,要使用内置的 standard Analyzer,只需将其名称 standard 指定为 type,还可以选择添加该 Analyzer 类型特有的额外配置,例如 stop_words:
- Python
- Java
- NodeJS
- Go
- cURL
- C++
analyzer_params = {
    "type": "standard", # Uses the standard built-in analyzer
    "stop_words": ["a", "an", "for"] # Defines a list of common words (stop words) to exclude from tokenization
}
Map<String, Object> analyzerParams = new HashMap<>();
analyzerParams.put("type", "standard");
analyzerParams.put("stop_words", Arrays.asList("a", "an", "for"));
const analyzer_params = {
    "type": "standard", // Uses the standard built-in analyzer
    "stop_words": ["a", "an", "for"] // Defines a list of common words (stop words) to exclude from tokenization
};
analyzerParams := map[string]any{"type": "standard", "stop_words": []string{"a", "an", "for"}}
export analyzerParams='{
       "type": "standard",
       "stop_words": ["a", "an", "for"]
    }'
nlohmann::json analyzer_params = {
    {"type", "standard"},
    {"stop_words",  {"a", "an", "for"}},
};
要检查 Analyzer 的执行结果,请使用 run_analyzer 方法:
- Python
- Java
- NodeJS
- Go
- cURL
- C++
# Sample text to analyze
text = "An efficient system relies on a robust analyzer to correctly process text for various applications."

# Run analyzer
result = client.run_analyzer(
    text,
    analyzer_params
)
import io.milvus.v2.service.vector.request.RunAnalyzerReq;
import io.milvus.v2.service.vector.response.RunAnalyzerResp;

List<String> texts = new ArrayList<>();
texts.add("An efficient system relies on a robust analyzer to correctly process text for various applications.");

RunAnalyzerResp resp = client.runAnalyzer(RunAnalyzerReq.builder()
        .texts(texts)
        .analyzerParams(analyzerParams)
        .build());
List<RunAnalyzerResp.AnalyzerResult> results = resp.getResults();
// javascrip# Sample text to analyze
const text = "An efficient system relies on a robust analyzer to correctly process text for various applications."

// Run analyzer
const result = await client.run_analyzer({
    text,
    analyzer_params
});
import (
    "context"
    "encoding/json"
    "fmt"

    "github.com/milvus-io/milvus/client/v2/milvusclient"
)

bs, _ := json.Marshal(analyzerParams)
texts := []string{"An efficient system relies on a robust analyzer to correctly process text for various applications."}
option := milvusclient.NewRunAnalyzerOption(texts).
    WithAnalyzerParams(string(bs))

result, err := client.RunAnalyzer(ctx, option)
if err != nil {
    fmt.Println(err.Error())
    // handle error
}
# restful
export MILVUS_HOST="YOUR_CLUSTER_ENDPOINT"
export TEXT_TO_ANALYZE="An efficient system relies on a robust analyzer to correctly process text for various applications."
curl -X POST "http://${MILVUS_HOST}/v2/vectordb/common/run_analyzer" \
  -H "Content-Type: application/json" \
  -H "Request-Timeout: 10" \
  -d '{
    "text": ["'"${TEXT_TO_ANALYZE}"'"],
    "analyzerParams": "{\"type\":\"standard\",\"stop_words\":[\"a\",\"an\",\"for\"]}"
  }'
std::string text = "An efficient system relies on a robust analyzer to correctly process text for various applications.";

auto request = milvus::RunAnalyzerRequest()
                       .AddText(text)
                       .WithAnalyzerParams(analyzer_params);

milvus::RunAnalyzerResponse response;
auto status = client->RunAnalyzer(request, response);
if (!status.IsOk()) {
    std::cout << status.Message() << std::endl;
}
输出如下:
['efficient', 'system', 'relies', 'on', 'robust', 'analyzer', 'to', 'correctly', 'process', 'text', 'various', 'applications']
这表明 Analyzer 会过滤停用词 "a"、"an" 和 "for",并返回其余有意义的 token,从而正确完成输入文本的分词。
上述内置 standard Analyzer 的配置等同于使用以下参数设置自定义 Analyzer。其中显式定义了 tokenizer 和 filter 选项,以实现等效的 Function 行为:
- Python
- Java
- NodeJS
- Go
- cURL
- C++
analyzer_params = {
    "tokenizer": "standard",
    "filter": [
        "lowercase",
        {
            "type": "stop",
            "stop_words": ["a", "an", "for"]
        }
    ]
}
Map<String, Object> analyzerParams = new HashMap<>();
analyzerParams.put("tokenizer", "standard");
analyzerParams.put("filter",
        Arrays.asList("lowercase",
                new HashMap<String, Object>() {{
                    put("type", "stop");
                    put("stop_words", Arrays.asList("a", "an", "for"));
                }}));
const analyzer_params = {
    "tokenizer": "standard",
    "filter": [
        "lowercase",
        {
            "type": "stop",
            "stop_words": ["a", "an", "for"]
        }
    ]
};
analyzerParams = map[string]any{"tokenizer": "standard",
    "filter": []any{"lowercase", map[string]any{
        "type":       "stop",
        "stop_words": []string{"a", "an", "for"},
    }}}
export analyzerParams='{
       "type": "standard",
       "filter":  [
       "lowercase",
       {
            "type": "stop",
            "stop_words": ["a", "an", "for"]
       }
   ]
}'
nlohmann::json analyzer_params = {
    {"type", "standard"},
    {"filter", {"lowercase", {{"type", "stop"}, {"stop_words", {"a", "an", "for"}}}}},
};
Zilliz Cloud 提供以下内置 Analyzer,每种 Analyzer 都针对特定的文本处理需求而设计:
-
standard:适用于通用文本处理,采用标准分词和小写过滤。 -
english:针对英语文本进行优化,并支持英语停用词。 -
chinese:专用于处理中文文本,采用适合中文语言结构的分词方式。
自定义 Analyzer
对于更高级的文本处理,Zilliz Cloud 中的自定义 Analyzer 允许您同时指定分词器和过滤器,构建定制的文本处理管道。这种配置非常适合需要精确控制的专用场景。
分词器
分词器是自定义 Analyzer 的必需组件,它通过将输入文本拆分为独立单元(即 token)来启动 Analyzer 管道。根据分词器类型,分词过程会遵循特定规则,例如按空格或标点符号拆分。这样可以更精确、独立地处理每个单词或短语。
例如,分词器会将文本 "Vector Database Built for Scale" 转换为多个独立的 token:
["Vector", "Database", "Built", "for", "Scale"]
指定分词器的示例:
- Python
- Java
- NodeJS
- Go
- cURL
- C++
analyzer_params = {
    "tokenizer": "whitespace",
}
Map<String, Object> analyzerParams = new HashMap<>();
analyzerParams.put("tokenizer", "whitespace");
const analyzer_params = {
    "tokenizer": "whitespace",
};
analyzerParams = map[string]any{"tokenizer": "whitespace"}
export analyzerParams='{
       "type": "whitespace"
    }'
nlohmann::json analyzer_params = {
    {"type", "whitespace"}
};
过滤器
过滤器是可选组件,用于按需转换或处理分词器生成的 token。例如,对分词结果 ["Vector", "Database", "Built", "for", "Scale"] 应用 lowercase 过滤器后,结果可能如下:
["vector", "database", "built", "for", "scale"]
根据配置需求,自定义 Analyzer 中的过滤器可以是内置过滤器,也可以是自定义过滤器。
-
内置过滤器:由 Zilliz Cloud 预先配置,只需少量设置。指定过滤器名称即可直接使用。以下过滤器可作为内置过滤器直接使用:
-
lowercase:将文本转换为小写,以支持不区分大小写的匹配。有关详细信息,请参阅 Lowercase。 -
asciifolding:将非 ASCII 字符转换为对应的 ASCII 字符,以简化多语言文本处理。有关详细信息,请参阅 ASCII folding。 -
alphanumonly:仅保留字母和数字字符,移除其他字符。有关详细信息,请参阅 Alphanumonly。 -
cnalphanumonly:移除包含中文字符、英文字母或数字以外任何字符的 token。有关详细信息,请参阅 Cnalphanumonly。 -
cncharonly:移除包含任何非中文字符的 token。有关详细信息,请参阅 Cncharonly。 -
pinyin:为中文 token 添加拼音形式,以支持基于拼音的中文文本匹配。有关详细信息,请参阅 Pinyin。
使用内置过滤器的示例:
- Python
- Java
- NodeJS
- Go
- cURL
- C++
pythonanalyzer_params = {"tokenizer": "standard", # Mandatory: Specifies tokenizer"filter": ["lowercase"], # Optional: Built-in filter that converts text to lowercase}javaMap<String, Object> analyzerParams = new HashMap<>();analyzerParams.put("tokenizer", "standard");analyzerParams.put("filter", Collections.singletonList("lowercase"));javascriptconst analyzer_params = {"tokenizer": "standard", // Mandatory: Specifies tokenizer"filter": ["lowercase"], // Optional: Built-in filter that converts text to lowercase}goanalyzerParams = map[string]any{"tokenizer": "standard","filter": []any{"lowercase"}}bashexport analyzerParams='{"type": "standard","filter": ["lowercase"]}'c++nlohmann::json analyzer_params = {{"type", "standard"},{"filter", {"lowercase"}},}; -
-
自定义过滤器:自定义过滤器支持专用配置。您可以选择有效的过滤器类型\(
filter.type\),并为该类型添加特定设置。以下过滤器类型支持自定义:-
stop:通过设置停用词列表\(例如"stop_words": ["of", "to"]\)移除指定的常见词。有关详细信息,请参阅 Stop。 -
length:根据长度条件排除 token,例如设置 token 的最大长度。有关详细信息,请参阅 Length。 -
stemmer:将单词还原为词干,以支持更灵活的匹配。有关详细信息,请参阅 Stemmer。
配置自定义过滤器的示例:
- Python
- Java
- NodeJS
- Go
- cURL
- C++
pythonanalyzer_params = {"tokenizer": "standard", # Mandatory: Specifies tokenizer"filter": [{"type": "stop", # Specifies 'stop' as the filter type"stop_words": ["of", "to"], # Customizes stop words for this filter type}]}javaMap<String, Object> analyzerParams = new HashMap<>();analyzerParams.put("tokenizer", "standard");analyzerParams.put("filter",Collections.singletonList(new HashMap<String, Object>() {{put("type", "stop");put("stop_words", Arrays.asList("a", "an", "for"));}}));javascriptconst analyzer_params = {"tokenizer": "standard", // Mandatory: Specifies tokenizer"filter": [{"type": "stop", // Specifies 'stop' as the filter type"stop_words": ["of", "to"], // Customizes stop words for this filter type}]};goanalyzerParams = map[string]any{"tokenizer": "standard","filter": []any{map[string]any{"type": "stop","stop_words": []string{"of", "to"},}}}bashexport analyzerParams='{"type": "standard","filter": [{"type": "stop","stop_words": ["a", "an", "for"]}]}'c++nlohmann::json analyzer_params = {{"type", "standard"},{"filter", {{{"type", "stop"}, {"stop_words", {"a", "an", "for"}}}}},}; -
使用示例
在本例中,您将创建一个包含以下字段的 Collection Schema:
-
一个用于存储 Embedding 的向量字段。
-
两个用于文本处理的
VARCHAR字段:-
一个字段使用内置 Analyzer。
-
另一个字段使用自定义 Analyzer。
-
将这些配置添加到 Collection 前,请先使用 run_analyzer 方法验证每个 Analyzer。
步骤 1:初始化 MilvusClient 并创建 Schema
首先设置 Milvus 客户端并创建一个新的 Schema。
- Python
- Java
- NodeJS
- Go
- cURL
- C++
from pymilvus import MilvusClient, DataType

# Set up a Milvus client
client = MilvusClient(
    uri="YOUR_CLUSTER_ENDPOINT",
    token="YOUR_CLUSTER_TOKEN"
)

# Create a new schema
schema = client.create_schema(auto_id=True, enable_dynamic_field=False)
import io.milvus.v2.client.ConnectConfig;
import io.milvus.v2.client.MilvusClientV2;
import io.milvus.v2.common.DataType;
import io.milvus.v2.common.IndexParam;
import io.milvus.v2.service.collection.request.AddFieldReq;
import io.milvus.v2.service.collection.request.CreateCollectionReq;

// Set up a Milvus client
ConnectConfig config = ConnectConfig.builder()
        .uri("YOUR_CLUSTER_ENDPOINT")
        .token("YOUR_CLUSTER_TOKEN")
        .build();
MilvusClientV2 client = new MilvusClientV2(config);

// Create schema
CreateCollectionReq.CollectionSchema schema = CreateCollectionReq.CollectionSchema.builder()
        .enableDynamicField(false)
        .build();
import { MilvusClient, DataType } from "@zilliz/milvus2-sdk-node";

// Set up a Milvus client
const client = new MilvusClient({
    address: "YOUR_CLUSTER_ENDPOINT",
    token: "YOUR_CLUSTER_TOKEN"
);
import (
    "context"
    "fmt"

    "github.com/milvus-io/milvus/client/v2/column"
    "github.com/milvus-io/milvus/client/v2/entity"
    "github.com/milvus-io/milvus/client/v2/index"
    "github.com/milvus-io/milvus/client/v2/milvusclient"
)

ctx, cancel := context.WithCancel(context.Background())
defer cancel()

cli, err := milvusclient.New(ctx, &milvusclient.ClientConfig{
    Address: "YOUR_CLUSTER_ENDPOINT",
    token: "YOUR_CLUSTER_TOKEN"
})
if err != nil {
    fmt.Println(err.Error())
    // handle err
}
defer client.Close(ctx)

schema := entity.NewSchema().WithAutoID(true).WithDynamicFieldEnabled(false)
# restful
export MILVUS_HOST="YOUR_CLUSTER_ENDPOINT"
export MILVUS_TOKEN="YOUR_CLUSTER_TOKEN"
curl -X POST "http://${MILVUS_HOST}/v2/vectordb/collections/create" \
  -H "Content-Type: application/json" \
  -H "Request-Timeout: 10" \
  -H "Authorization: Bearer ${MILVUS_TOKEN}" \
  -d '{
    "collectionName": "my_collection",
    "dimension": 768,
    "schema": {
      "autoId": true,
      "enableDynamicField": false
    }
  }'
#include "milvus/MilvusClientV2.h"

auto client = milvus::MilvusClientV2::Create();

milvus::ConnectParam connect_param{"YOUR_CLUSTER_ENDPOINT", "YOUR_CLUSTER_TOKEN"};
auto status = client->Connect(connect_param);
if (!status.IsOk()) {
    std::cout << status.Message() << std::endl;
}

milvus::CollectionSchemaPtr schema = std::make_shared<milvus::CollectionSchema>();
schema->SetEnableDynamicField(false);
步骤 2:定义并验证 Analyzer 配置
-
配置并验证内置 Analyzer (
english):-
配置:定义内置英语 Analyzer 的参数。
-
验证:使用
run_analyzer检查该 Analyzer 配置是否生成预期的分词结果。
- Python
- Java
- NodeJS
- Go
- cURL
- C++
python# Built-in analyzer configuration for English text processinganalyzer_params_built_in = {"type": "english"}# Verify built-in analyzer configurationsample_text = "Milvus simplifies text analysis for search."result = client.run_analyzer(sample_text, analyzer_params_built_in)print("Built-in analyzer output:", result)# Expected output:# Built-in analyzer output: ['milvus', 'simplifi', 'text', 'analysi', 'search']javaMap<String, Object> analyzerParamsBuiltin = new HashMap<>();analyzerParamsBuiltin.put("type", "english");List<String> texts = new ArrayList<>();texts.add("Milvus simplifies text analysis for search.");RunAnalyzerResp resp = client.runAnalyzer(RunAnalyzerReq.builder().texts(texts).analyzerParams(analyzerParamsBuiltin).build());List<RunAnalyzerResp.AnalyzerResult> results = resp.getResults();javascript// Use a built-in analyzer for VARCHAR field `title_en`const analyzer_params_built_in = {type: "english",};const sample_text = "Milvus simplifies text analysis for search.";const result = await client.run_analyzer({text: sample_text,analyzer_params: analyzer_params_built_in});goanalyzerParamsBuiltin := map[string]any{"type": "english"}bs, _ := json.Marshal(analyzerParamsBuiltin)texts := []string{"Milvus simplifies text analysis for search."}option := milvusclient.NewRunAnalyzerOption(texts).WithAnalyzerParams(string(bs))result, err := client.RunAnalyzer(ctx, option)if err != nil {fmt.Println(err.Error())// handle error}bash# restfulexport MILVUS_HOST="YOUR_CLUSTER_ENDPOINT"export SAMPLE_TEXT="Milvus simplifies text analysis for search."curl -X POST "http://${MILVUS_HOST}/v2/vectordb/common/run_analyzer" \-H "Content-Type: application/json" \-H "Request-Timeout: 10" \-d '{"text": ["'"${SAMPLE_TEXT}"'"],"analyzerParams": "{\"type\":\"english\"}"}'c++nlohmann::json analyzer_params_built_in = {{"type", "standard"}};std::string sample_text = "Milvus simplifies text analysis for search.";auto request = milvus::RunAnalyzerRequest().AddText(sample_text).WithAnalyzerParams(analyzer_params_built_in);milvus::RunAnalyzerResponse response;auto status = client->RunAnalyzer(request, response);if (!status.IsOk()) {std::cout << status.Message() << std::endl;} -
-
配置并验证自定义 Analyzer:
-
配置:定义一个自定义 Analyzer,使用标准分词器、内置小写过滤器,以及用于限制 token 长度和移除停用词的自定义过滤器。
-
验证:使用
run_analyzer确认自定义 Analyzer 配置能够按预期处理文本。
- Python
- Java
- NodeJS
- Go
- cURL
- C++
python# Custom analyzer configuration with a standard tokenizer and custom filtersanalyzer_params_custom = {"tokenizer": "standard","filter": ["lowercase", # Built-in filter: convert tokens to lowercase{"type": "length", # Custom filter: restrict token length"max": 40},{"type": "stop", # Custom filter: remove specified stop words"stop_words": ["of", "for"]}]}# Verify custom analyzer configurationsample_text = "Milvus provides flexible, customizable analyzers for robust text processing."result = client.run_analyzer(sample_text, analyzer_params_custom)print("Custom analyzer output:", result)# Expected output:# Custom analyzer output: ['milvus', 'provides', 'flexible', 'customizable', 'analyzers', 'robust', 'text', 'processing']java// Configure a custom analyzerMap<String, Object> analyzerParamsCustom = new HashMap<>();analyzerParamsCustom.put("tokenizer", "standard");analyzerParamsCustom.put("filter",Arrays.asList("lowercase",new HashMap<String, Object>() {{put("type", "length");put("max", 40);}},new HashMap<String, Object>() {{put("type", "stop");put("stop_words", Arrays.asList("of", "for"));}}));List<String> texts = new ArrayList<>();texts.add("Milvus provides flexible, customizable analyzers for robust text processing.");RunAnalyzerResp resp = client.runAnalyzer(RunAnalyzerReq.builder().texts(texts).analyzerParams(analyzerParamsCustom).build());List<RunAnalyzerResp.AnalyzerResult> results = resp.getResults();javascript// Configure a custom analyzer for VARCHAR field `title`const analyzer_params_custom = {tokenizer: "standard",filter: ["lowercase",{type: "length",max: 40,},{type: "stop",stop_words: ["of", "to"],},],};const sample_text = "Milvus provides flexible, customizable analyzers for robust text processing.";const result = await client.run_analyzer({text: sample_text,analyzer_params: analyzer_params_custom});goanalyzerParamsCustom = map[string]any{"tokenizer": "standard","filter": []any{"lowercase",map[string]any{"type": "length","max": 40,map[string]any{"type": "stop","stop_words": []string{"of", "to"},}}}bs, _ := json.Marshal(analyzerParamsCustom)texts := []string{"Milvus provides flexible, customizable analyzers for robust text processing."}option := milvusclient.NewRunAnalyzerOption(texts).WithAnalyzerParams(string(bs))result, err := client.RunAnalyzer(ctx, option)if err != nil {fmt.Println(err.Error())// handle error}bash# curlexport MILVUS_HOST="YOUR_CLUSTER_ENDPOINT"export SAMPLE_TEXT="Milvus provides flexible, customizable analyzers for robust text processing."curl -X POST "http://${MILVUS_HOST}/v2/vectordb/common/run_analyzer" \-H "Content-Type: application/json" \-H "Request-Timeout: 10" \-d '{"text": ["'"${SAMPLE_TEXT}"'"],"analyzerParams": "{\"tokenizer\":\"standard\",\"filter\":[\"lowercase\",{\"type\":\"length\",\"max\":40},{\"type\":\"stop\",\"stop_words\":[\"of\",\"for\"]}]}"}'c++nlohmann::json analyzer_params_custom = {{"tokenizer", "standard"},{"filter", {"lowercase",{{"type", "length"}, {"max", 40}},{{"type", "stop"}, {"stop_words", {"of", "to"}}}}},};const std::vector<std::string> texts = {"Milvus provides flexible, customizable analyzers for robust text processing."};auto request = milvus::RunAnalyzerRequest().WithTexts(text_content).WithAnalyzerParams(analyzer_params_custom);milvus::RunAnalyzerResponse response;auto status = client->RunAnalyzer(request, response);if (!status.IsOk()) {std::cout << status.Message() << std::endl;} -
步骤 3:将 Analyzer 添加到 Schema 字段
验证 Analyzer 配置后,将其添加到 Schema 字段:
- Python
- Java
- NodeJS
- Go
- cURL
- C++
# Add VARCHAR field 'title_en' using the built-in analyzer configuration
schema.add_field(
    field_name='title_en',
    datatype=DataType.VARCHAR,
    max_length=1000,
    enable_analyzer=True,
    analyzer_params=analyzer_params_built_in,
    enable_match=True,
)

# Add VARCHAR field 'title' using the custom analyzer configuration
schema.add_field(
    field_name='title',
    datatype=DataType.VARCHAR,
    max_length=1000,
    enable_analyzer=True,
    analyzer_params=analyzer_params_custom,
    enable_match=True,
)

# Add a vector field for embeddings
schema.add_field(field_name="embedding", datatype=DataType.FLOAT_VECTOR, dim=3)

# Add a primary key field
schema.add_field(field_name="id", datatype=DataType.INT64, is_primary=True)
schema.addField(AddFieldReq.builder()
        .fieldName("title_en")
        .dataType(DataType.VarChar)
        .maxLength(1000)
        .enableAnalyzer(true)
        .analyzerParams(analyzerParamsBuiltin)
        .enableMatch(true) // must enable this if you use TextMatch
        .build());

schema.addField(AddFieldReq.builder()
        .fieldName("title")
        .dataType(DataType.VarChar)
        .maxLength(1000)
        .enableAnalyzer(true)
        .analyzerParams(analyzerParamsCustom)
        .enableMatch(true) // must enable this if you use TextMatch
        .build());

// Add vector field
schema.addField(AddFieldReq.builder()
        .fieldName("embedding")
        .dataType(DataType.FloatVector)
        .dimension(3)
        .build());
// Add primary field
schema.addField(AddFieldReq.builder()
        .fieldName("id")
        .dataType(DataType.Int64)
        .isPrimaryKey(true)
        .autoID(true)
        .build());
// Create schema
const schema = {
  auto_id: true,
  fields: [
    {
      name: "id",
      type: DataType.INT64,
      is_primary: true,
    },
    {
      name: "title_en",
      data_type: DataType.VARCHAR,
      max_length: 1000,
      enable_analyzer: true,
      analyzer_params: analyzerParamsBuiltIn,
      enable_match: true,
    },
    {
      name: "title",
      data_type: DataType.VARCHAR,
      max_length: 1000,
      enable_analyzer: true,
      analyzer_params: analyzerParamsCustom,
      enable_match: true,
    },
    {
      name: "embedding",
      data_type: DataType.FLOAT_VECTOR,
      dim: 4,
    },
  ],
};
schema.WithField(entity.NewField().
    WithName("id").
    WithDataType(entity.FieldTypeInt64).
    WithIsPrimaryKey(true).
    WithIsAutoID(true),
).WithField(entity.NewField().
    WithName("embedding").
    WithDataType(entity.FieldTypeFloatVector).
    WithDim(3),
).WithField(entity.NewField().
    WithName("title_en").
    WithDataType(entity.FieldTypeVarChar).
    WithMaxLength(1000).
    WithEnableAnalyzer(true).
    WithAnalyzerParams(analyzerParamsBuiltin).
    WithEnableMatch(true),
).WithField(entity.NewField().
    WithName("title").
    WithDataType(entity.FieldTypeVarChar).
    WithMaxLength(1000).
    WithEnableAnalyzer(true).
    WithAnalyzerParams(analyzerParamsCustom).
    WithEnableMatch(true),
)
# restful
export SCHEMA_CONFIG='{
  "autoId": false,
  "enableDynamicField": false,
  "fields": [
    {
      "fieldName": "id",
      "dataType": "Int64",
      "isPrimary": true
    },
    {
      "fieldName": "title_en",
      "dataType": "VarChar",
      "elementTypeParams": {
        "max_length": "1000",
        "enable_analyzer": true,
        "analyzer_params": "{\"type\":\"english\"}",
        "enable_match": true
      }
    },
    {
      "fieldName": "title",
      "dataType": "VarChar",
      "elementTypeParams": {
        "max_length": "1000",
        "enable_analyzer": true,
        "analyzer_params": "{\"tokenizer\":\"standard\",\"filter\":[\"lowercase\",{\"type\":\"length\",\"max\":40},{\"type\":\"stop\",\"stop_words\":[\"of\",\"for\"]}]}",
        "enable_match": true
      }
    },
    {
      "fieldName": "embedding",
      "dataType": "FloatVector",
      "elementTypeParams": {
        "dim": "3"
      }
    }
  ]
}'
schema->AddField({"id", milvus::DataType::INT64, "", true, false});
schema->AddField(milvus::FieldSchema("title_en", milvus::DataType::VARCHAR).WithMaxLength(1000)
                    .EnableAnalyzer(true).EnableMatch(true).WithAnalyzerParams(analyzer_params_built_in));
schema->AddField(milvus::FieldSchema("title", milvus::DataType::VARCHAR).WithMaxLength(1000)
                    .EnableAnalyzer(true).EnableMatch(true).WithAnalyzerParams(analyzer_params_custom));
schema->AddField(milvus::FieldSchema("embedding", milvus::DataType::FLOAT_VECTOR).WithDimension(3));
步骤 4:准备索引参数并创建 Collection
- Python
- Java
- NodeJS
- Go
- cURL
- C++
# Set up index parameters for the vector field
index_params = client.prepare_index_params()
index_params.add_index(field_name="embedding", metric_type="COSINE", index_type="AUTOINDEX")

# Create the collection with the defined schema and index parameters
client.create_collection(
    collection_name="my_collection",
    schema=schema,
    index_params=index_params
)
// Set up index params for vector field
List<IndexParam> indexes = new ArrayList<>();
indexes.add(IndexParam.builder()
        .fieldName("embedding")
        .indexType(IndexParam.IndexType.AUTOINDEX)
        .metricType(IndexParam.MetricType.COSINE)
        .build());

// Create collection with defined schema
CreateCollectionReq requestCreate = CreateCollectionReq.builder()
        .collectionName("my_collection")
        .collectionSchema(schema)
        .indexParams(indexes)
        .build();
client.createCollection(requestCreate);
// Set up index params for vector field
const indexParams = [
  {
    name: "embedding",
    metric_type: "COSINE",
    index_type: "AUTOINDEX",
  },
];

// Create collection with defined schema
await client.createCollection({
  collection_name: "my_collection",
  schema: schema,
  index_params: indexParams,
});

console.log("Collection created successfully!");
idx := index.NewAutoIndex(index.MetricType(entity.COSINE))
indexOption := milvusclient.NewCreateIndexOption("my_collection", "embedding", idx)

err = client.CreateCollection(ctx,
    milvusclient.NewCreateCollectionOption("my_collection", schema).
        WithIndexOptions(indexOption))
if err != nil {
    fmt.Println(err.Error())
    // handle error
}
export INDEX_PARAMS='[{"fieldName": "embedding", "metricType": "COSINE", "indexType": "AUTOINDEX"}]'
# restful
curl -X POST "YOUR_CLUSTER_ENDPOINT/v2/vectordb/collections/create" \
  -H "Content-Type: application/json" \
  -H "Request-Timeout: 10" \
  -d "{
    \"collectionName\": \"my_collection\",
    \"schema\": ${SCHEMA_CONFIG},
    \"indexParams\": ${INDEX_PARAMS}
  }"
std::vector<milvus::IndexDesc> indexes = {
    milvus::IndexDesc("embedding", "", milvus::IndexType::AUTOINDEX, milvus::MetricType::COSINE)
}

auto status = client->CreateCollection(milvus::CreateCollectionRequest()
                                    .WithCollectionName("my_collection")
                                    .WithIndexes(std::move(indexes))
                                    .WithCollectionSchema(schema));
if (!status.IsOk()) {
    std::cout << status.Message() << std::endl;
}
在 Zilliz Cloud 控制台中使用
您也可以在 Zilliz Cloud 控制台中执行上述操作。有关详细信息,请播放下面的演示。
创建 Collection 后,Analyzer 配置不可更改。要更改 Analyzer 配置,请使用所需设置创建新的 Collection,然后迁移数据。
后续步骤
配置 Analyzer 时,建议阅读以下最佳实践文章,以确定最适合您使用场景的配置:
配置 Analyzer 后,您可以将其与 Zilliz Cloud 提供的文本检索功能结合使用。有关详细信息,请参阅: