创建 External Collection仅按需计算
External Collection 是 Zilliz Cloud 中的一种数据 Collection 类型,可直接访问存储在外部存储系统或数据库表(例如 AWS S3 和 Iceberg)中的数据,而无需将数据复制到 Zilliz Cloud 中。它充当数据湖之上的查询层,同时保持与 Zilliz Cloud 查询接口的兼容性。
概览
在典型的 AI 数据流水线中,用户通常已经将数据以 Parquet 或其他格式存储在自己的存储系统中,例如 AWS S3。要让 Zilliz Cloud 使用这些外部存储的数据,用户通常需要通过 Extract-Transform-Load(ETL)流水线将其导入到 Zilliz Cloud 自身的存储中。
这种“将数据带入 Zilliz Cloud”的工作流会产生冗余数据,不仅难以保持同步,还会增加确保数据一致性的工程维护负担。
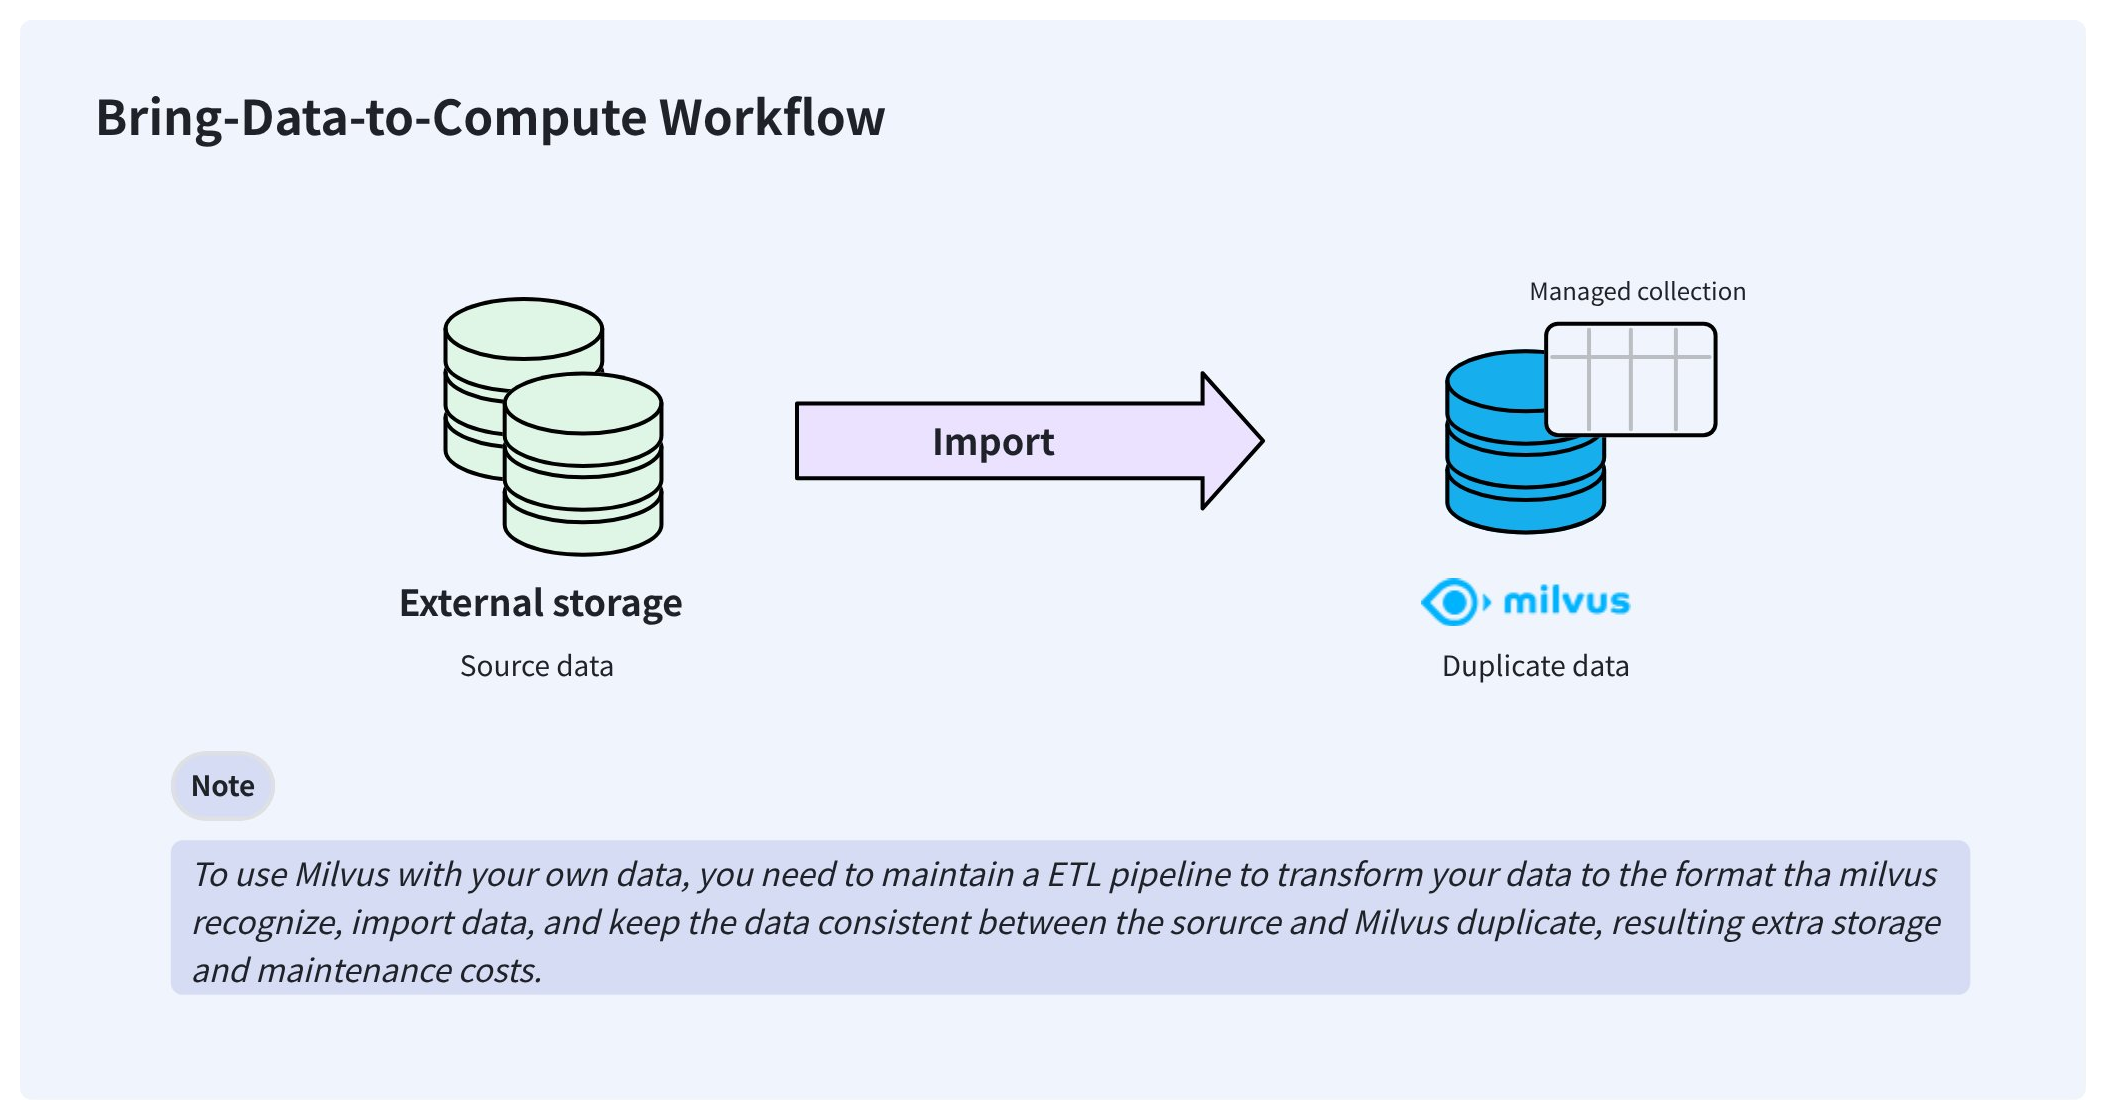
为了解决这些问题,Zilliz Cloud 提供了 External Collection,使您无需担心数据同步和 ETL 流水线,即可直接从 Zilliz Cloud 访问外部存储的数据。

创建 External Collection 后,它可以直接访问您的数据,并让数据继续保留在原始存储位置。在后台,Zilliz Cloud 会创建 manifest 文件,用于记录 Zilliz Cloud 元数据与外部数据文件中各行之间的映射关系。manifest 文件准备完成后,您就可以像在 Managed Collection 中一样,为 External Collection 中数据创建索引。
当数据发生变化时,手动触发一次亚秒级 Refresh 即可更新元数据,从而让 Zilliz Cloud 始终保持最新状态。
External Collection 可用于按需计算 Database 中。
步骤 1: 创建 Schema
与创建 Managed Collection 类似,创建 External Collection 之前也需要先创建 Schema。不过,External Collection 的 Schema 与 Managed Collection 略有不同。
准备工作
-
您已获得具有足够权限的 API 密钥,可用于在按需计算 Database 中创建 External Collection。
有关详细信息,请参见 API 密钥。
-
您已将对象存储桶集成到 Zilliz Cloud。
-
您已基于存储集成创建 External Volume,并确保该 Volume 中包含目标数据文件。
有关详细信息,请参见 External Volume。
支持的数据源
Zilliz Cloud 支持以下数据源,您需要根据所选格式提供对应的 external source。
-
parquet将
external_source设置为包含目标 Parquet 文件的文件夹。 -
vortex,将
external_source设置为包含 0.56 版本 Vortex 列式文件的文件夹。 -
lance-table将
external_source设置为一个文件夹路径,该路径中包含 _transactions、_versions 和 data 等子目录。 -
iceberg-table将
external_source设置为 Iceberg 表的metadata.json文件,并传入 snapshot ID,例如:external_spec={"format": "iceberg-table","snapshot_id": "473984310232959286"}
设置 Schema
当您拥有包含目标数据文件的 external volume 后,即可创建 Schema,将 Collection 列映射到 Parquet 文件(parquet)、Lance 表(lance-table)、Iceberg 表(iceberg-table)或 0.56.0 格式的 Vortex 文件
(vortex)。
external source 应以斜杠(/)结尾,以表明这是一个文件夹。
- Python
- Java
- Go
- NodeJS
- cURL
from pymilvus import MilvusClient, DataType

schema = MilvusClient.create_schema(
    external_source='volume://my_volume/path/to/a/folder/',
    external_spec='{"format": "parquet"}'
)
import com.google.gson.JsonObject;
import io.milvus.v2.service.collection.request.CreateCollectionReq;

JsonObject externalSpec = new JsonObject();
externalSpec.addProperty("format", "parquet");
CreateCollectionReq.CollectionSchema schema = CreateCollectionReq.CollectionSchema.builder()
        .externalSource("volume://my_volume/path/to/a/folder/")
        .externalSpec(externalSpec)
        .build();
import (
    "github.com/milvus-io/milvus/client/v2/entity"
    client "github.com/milvus-io/milvus/client/v2/milvusclient"
)

schema := entity.NewSchema().
    WithName("product_embeddings").
    WithExternalSource("volume://my_volume/path/to/a/folder/").
    WithExternalSpec(\\`{"format": "parquet"}\\`)
// node
export fields='[
    {
        "fieldName": "product_id",
        "dataType": "Int64",
        "isPrimary": true
    },
    {
        "fieldName": "embedding",
        "dataType": "FloatVector",
        "elementTypeParams": {
            "dim": "768"
        }
    },
    {
        "fieldName": "product_name",
        "dataType": "VarChar",
        "elementTypeParams": {
            "max_length": 512
        }
    }
]'
步骤 2: 添加字段
Schema 准备好后,您可以按如下方式添加字段:
- Python
- Java
- Go
- NodeJS
- cURL
schema.add_field(
    field_name="product_id",
    datatype=DataType.INT64,
    # highlight-next
    external_field="id" # field name in the external data file
)
schema.add_field(
    field_name="product_name",
    datatype=DataType.VARCHAR,
    max_length=512,
    # highlight-next
    external_field="name"
)
schema.add_field(
    field_name="embedding",
    datatype=DataType.FLOAT_VECTOR,
    dim=768,
    # highlight-next
    external_field="vector"
)
import io.milvus.v2.common.DataType;
import io.milvus.v2.service.collection.request.AddFieldReq;

schema.addField(AddFieldReq.builder()
        .fieldName("product_id")
        .dataType(DataType.Int64)
        .externalField("id")
        .build());
schema.addField(AddFieldReq.builder()
        .fieldName("product_name")
        .dataType(DataType.VarChar)
        .maxLength(512)
        .externalField("name")
        .build());
schema.addField(AddFieldReq.builder()
        .fieldName("embedding")
        .dataType(DataType.FloatVector)
        .dimension(768)
        .externalField("vector")
        .build());
import (
    "github.com/milvus-io/milvus/client/v2/entity"
    client "github.com/milvus-io/milvus/client/v2/milvusclient"
)

schema = schema.
    WithField(
        entity.NewField().
            WithName("product_id").
            WithDataType(entity.FieldTypeInt64).
            WithExternalField("id"),
    ).
    WithField(
        entity.NewField().
            WithName("product_name").
            WithDataType(entity.FieldTypeVarChar).
            WithMaxLength(512).
            WithExternalField("name"),
    ).
    WithField(
        entity.NewField().
            WithName("embedding").
            WithDataType(entity.FieldTypeFloatVector).
            WithDim(768).
            WithExternalField("vector"),
    )
// node
export schema="{
    \"externalSource\": \"volume://my_volume/path/to/a/folder\",
    \"externalSpec\": \"{\\\"format\\\": \\\"parquet\\\"}\",
    \"fields\": $fields
}"
步骤 3: 创建 Collection
将所有字段添加到 Schema 后,您就可以创建 External Collection。
您可以在项目层级的 Database 中创建 External Collection。这类 Database 通常需要关联到某个 On-demand 集群。
- Python
- Java
- Go
- NodeJS
- cURL
# connect the database
client = MilvusClient(
    uri="https://{project-id}.{region}.vectordb.zilliz.com.cn",
    token="YOUR_API_KEY"
)

client.use_database(
    db_name="my_database"
)
# create the collection
client.create_collection(
    collection_name="test_collection",
    schema=schema
)
import io.milvus.v2.client.ConnectConfig;
import io.milvus.v2.client.MilvusClientV2;

ConnectConfig connectConfig = ConnectConfig.builder()
        .uri("https://{project-id}.{region}.vectordb.zilliz.com.cn")
        .token("YOUR_API_KEY")
        .build();
MilvusClientV2 client = new MilvusClientV2(connectConfig);
CreateCollectionReq createReq = CreateCollectionReq.builder()
        .dbName("my_database")
        .collectionName("test_collection")
        .collectionSchema(schema)
        .build();
client.createCollection(createReq);
import (
    "github.com/milvus-io/milvus/client/v2/entity"
    client "github.com/milvus-io/milvus/client/v2/milvusclient"
)

ctx, cancel := context.WithCancel(context.Background())
defer cancel()
milvusAddr := "https://{project-id}.{region}.vectordb.zilliz.com.cn"
token := "YOUR_API_KEY"
client, err := milvusclient.New(ctx, &milvusclient.ClientConfig{
    Address: milvusAddr,
    APIKey: token
})
err = client.CreateCollection(ctx, milvusclient.NewCreateCollectionOption("test_collection", schema).
    WithDBName("my_database").
    WithIndexOptions(indexOptions...))

if err != nil {
    fmt.Println(err.Error())
    // handle error
}
// node
export PROJECT_ENDPOINT='https://{project-id}.{region}.vectordb.zilliz.com.cn'
curl --request POST \
--url "${PROJECT_ENDPOINT}/v2/vectordb/collections/create" \
--header "Authorization: Bearer ${TOKEN}" \
--header "Content-Type: application/json" \
-d "{
    \"dbName\": \"my_database\",
    \"collectionName\": \"test_collection\",
    \"schema\": $schema
}"
步骤 4: 创建 Index
您可以像在 Managed Collection 中一样,为 External Collection 的列创建索引。
- Python
- Java
- Go
- NodeJS
- cURL
index_params = client.prepare_index_params()
# Add indexes
index_params.add_index(
    field_name="embedding",
    index_type="AUTOINDEX",
    metric_type="COSINE"
)
index_params.add_index(
    field_name="product_name",
    index_type="AUTOINDEX"
)
client.create_index(
    db_name="my_database",
    collection_name="test_collection",
    index_params=index_params
)
import io.milvus.v2.common.IndexParam;
import io.milvus.v2.service.index.request.CreateIndexReq;
import java.util.*;

IndexParam indexParamForIdField = IndexParam.builder()
        .fieldName("product_name")
        .indexType(IndexParam.IndexType.AUTOINDEX)
        .build();
IndexParam indexParamForVectorField = IndexParam.builder()
        .fieldName("embedding")
        .indexType(IndexParam.IndexType.AUTOINDEX)
        .metricType(IndexParam.MetricType.COSINE)
        .build();
List<IndexParam> indexParams = new ArrayList<>();
indexParams.add(indexParamForIdField);
indexParams.add(indexParamForVectorField);
CreateIndexReq createIndexReq = CreateIndexReq.builder()
        .dbName("my_database")
        .collectionName("test_collection")
        .indexParams(indexParams)
        .build();
client.createIndex(createIndexReq);
import (
    "github.com/milvus-io/milvus/client/v2/entity"
    "github.com/milvus-io/milvus/client/v2/index"
    "github.com/milvus-io/milvus/client/v2/milvusclient"
)

collectionName := "test_collection"
indexOptions := []milvusclient.CreateIndexOption{
    milvusclient.NewCreateIndexOption(collectionName, "embedding", index.NewAutoIndex(entity.COSINE)),
    milvusclient.NewCreateIndexOption(collectionName, "product_name", index.NewAutoIndex(index.AUTOINDEX)),
}
indexTask, err := client.CreateIndex(ctx, indexOptions)
if err != nil {
    // handler err
}
err = indexTask.Await(ctx)
if err != nil {
    // handler err
}
client.createIndex({
    db_name: "my_database",
    collection_name: "test_collection",
    field_name: "product_name",
    index_type: "AUTOINDEX"
})
client.createIndex({
    db_name: "my_database",
    collection_name: "test_collection",
    field_name: "embedding",
    index_type: "AUTOINDEX",
    metric_type: "COSINE"
})
export indexParams='[
        {
            "fieldName": "embedding",
            "indexName": "my_vector",
            "indexType": "AUTOINDEX"
        },
        {
            "fieldName": "product_name",
            "indexName": "my_id",
            "indexType": "AUTOINDEX"
        }
    ]'

curl --request POST \
--url "${PROJECT_ENDPOINT}/v2/vectordb/indexes/create" \
--header "Authorization: Bearer ${TOKEN}" \
--header "Content-Type: application/json" \
-d "{
    \"dbName\": \"my_database\",
    \"collectionName\": \"test_collection\",
    \"indexParams\": $indexParams
}"
步骤 5: Refresh 数据
Collection 创建完成后,请执行 refresh,以为您的数据创建元数据和索引。
- Python
- Java
- Go
- NodeJS
- cURL
job_id = client.refresh_external_collection(
    db_name="my_database",
    collection_name="test_collection"
)
while True:
    progress = client.get_refresh_external_collection_progress(job_id=job_id)
    print(f"  {progress.state}: {progress.progress}%")
    if progress.state == "RefreshCompleted":
        elapsed = progress.end_time - progress.start_time
        print(f"  Completed in {elapsed}ms")
        break
    elif progress.state == "RefreshFailed":
        print(f"  Failed: {progress.reason}")
        break
    time.sleep(2)
import io.milvus.v2.service.utility.request.GetRefreshExternalCollectionProgressReq;
import io.milvus.v2.service.utility.request.ListRefreshExternalCollectionJobsReq;
import io.milvus.v2.service.utility.request.RefreshExternalCollectionReq;
import io.milvus.v2.service.utility.response.GetRefreshExternalCollectionProgressResp;
import io.milvus.v2.service.utility.response.ListRefreshExternalCollectionJobsResp;
import io.milvus.v2.service.utility.response.RefreshExternalCollectionJobInfo;
import io.milvus.v2.service.utility.response.RefreshExternalCollectionResp;

while (true) {
    GetRefreshExternalCollectionProgressResp resp = client.getRefreshExternalCollectionProgress(
            GetRefreshExternalCollectionProgressReq.builder()
                    .jobId(jobId)
                    .build());
    RefreshExternalCollectionJobInfo jobInfo = resp.getJobInfo();
    if ("RefreshCompleted".equals(jobInfo.getState())) {
        long elapsed = jobInfo.getEndTime() - jobInfo.getStartTime();
        System.out.printf("  Refresh completed in %dms%n", elapsed);
        break;
    } else if ("RefreshFailed".equals(jobInfo.getState())) {
        System.out.printf("  Refresh failed: %s%n", jobInfo.getReason());
    }
    TimeUnit.SECONDS.sleep(2);
}
refreshResult, err := client.RefreshExternalCollection(ctx,
    client.NewRefreshExternalCollectionOption("test_collection"))
jobID := refreshResult.JobID
for {
    progress, _ := client.GetRefreshExternalCollectionProgress(ctx,
        client.NewGetRefreshExternalCollectionProgressOption(jobID))
    fmt.Printf("State: %s\n", progress.State)
    if progress.State == entity.RefreshStateCompleted {
        fmt.Println("Refresh completed!")
        break
    }
    if progress.State == entity.RefreshStateFailed {
        fmt.Printf("Refresh failed: %s\n", progress.Reason)
        break
    }
    time.Sleep(2 * time.Second)
}
// node
curl --request POST \
--url "${PROJECT_ENDPOINT}/v2/vectordb/jobs/external_collection/refresh" \
--header "Authorization: Bearer ${TOKEN}" \
--header "Content-Type: application/json" \
-d "{
    \"dbName\": \"my_database\",
    \"collectionName\": \"test_collection\",
    \"externalSource\": \"volume://my_volume/path/to/a/folder\",
    \"externalSpec\": \"{\\\"format\\\": \\\"parquet\\\"}\"
}"
Refresh 操作是异步操作,因此您需要通过轮询来监控其进度。
-
Refresh 操作会扫描数据文件的元数据,并据此生成 manifest 文件,通常耗时 150-250 毫秒。
-
manifest 文件记录了 Milvus 元数据与外部文件中各行之间的映射关系。
-
如果源数据发生更新,您需要再次手动调用 Refresh,以确保 Zilliz Cloud 保持最新状态。
-
如果一次 Refresh 需要移除所有有效元数据且没有任何新增数据插入,该操作将被拒绝。
-
对于按需计算场景 Database 中的 External Collection,您无需手动执行 load 和 release。
后续操作
Refresh External Collection 后,您就可以像使用任意 Managed Collection 一样,在 External Collection 中执行相似性搜索和查询。但需要注意的是,对于按需计算 Database 中的 Collection,在执行 Search 和 Query 之前,必须先将其附加到某个 On-demand 集群。有关详细信息,请参见按需计算。
在执行 Search、Query、Get 和 Hybrid Search 等 DQL 操作之前,您需要先创建一个 Session,以制定 On-demand 集群的计算资源。有关详细信息,请参见按需 DQL 操作。