使用 Struct Array 进行 Schema 设计
现代 AI 应用,尤其是在物联网(IoT)和自动驾驶领域,通常会对丰富的结构化事件进行推理:带有时间戳和向量嵌入的传感器读数、带有错误代码和音频片段的诊断日志,或带有位置、速度和场景上下文的行程片段。这些应用要求数据库原生支持嵌套数据的存储和搜索。
Zilliz Cloud没有要求用户将其原子结构事件转换为扁平数据模型,而是引入了 Struct Array,其中 Array 中的每个 Struct 都可以包含标量和向量,从而保留语义完整性。
为何需要 Struct Array
现代 AI 应用,从自动驾驶到多模态检索,越来越依赖嵌套的异构数据。传统的扁平数据模型难以表示“一个文档包含多个注释块”或“一个驾驶场景包含多个观察到的操作”等复杂关系。而 Zilliz Cloud 中的 Struct Array 数据类型填补了这方面的空白。
Struct Array 字段允许您将一组有序的 Structs 存入其中,每个 Struct 带有自己的标量和向量数据。这就让其尤其适用于存储如下类型的数据:
-
多层嵌套数据:具有多个子记录的父实体,例如包含许多文本块的书籍,或包含许多带注释帧的视频。
-
多模态向量嵌入:每个 Struct 可以容纳多个向量,例如文本嵌入加上图像嵌入,以及元数据。
-
时序或顺序数据:Array 字段中的 Struct 天然地可用于表示时间序列或逐步事件。
与存储 JSON 数据块或跨多个 Collection 拆分数据的传统解决方法不同,Struct Array 在 Zilliz Cloud 中提供原生模式强制、向量索引和高效存储。
Schema 设计指南
除了那些在 Schema 设计指南中提及的设计原则之外,您在数据模型设计时引入 Struct Array 之前还需要考虑如下因素:
定义 Struct Schema
在向您的 Collection 中添加 Array 类型的字段前,您需要定义内部 Struct 的 Schema。这包括明确定义其中每个字段的数据类型,如标量(VARCHAR、INT、BOOLEAN 等)和向量(FLOAT_VECTOR)。
建议您仅包含用于检索或显示的字段,以保持 Struct Schema 的简洁。避免因包含未使用的元数据而导致 Schema 臃肿。
谨慎设置 Max Capacity
每个 Array 字段都有一个属性,用于指定了每个 Struct Array 字段所能容纳的最大元素数量。请根据实际情况的上限来设置此属性。例如,每个文档有 1000个 文本块,或每个驾驶场景有 100 个操作。
过高的值会浪费内存,你需要进行一些计算来确定 Array 字段中 Struct 的最大数量。
为 Struct 中的向量字段创建索引
索引对于向量字段是必需的,包括集合中的向量字段和在结构体中定义的向量字段。对于结构体中的向量字段,您应该使用 AUTOINDEX 作为索引类型,使用 MAX_SIM 系列相似度类型作为度量类型。
关于 Struct Array 的更多限制,可以阅读使用限制一节的内容。
一个现实世界的例子:为自动驾驶数据集 CoVLA 建模
由 Turing Motors 推出并被 2025 年冬季计算机视觉应用会议(WACV)接受的综合视觉-语言-行动(CoVLA)数据集,为在自动驾驶中训练和评估视觉-语言-行动(VLA)模型提供了丰富的基础。每个数据点(通常是一个视频片段)不仅包含原始视觉输入,还包含如下的结构化的说明信息:
-
自车行为(如:“为避开对向来车向左并道”)
-
对象探测(如:前车、人行道、交通信号灯等),以及
-
逐帧详情描述
该数据级多层级、多模态的自然属性,使其非常适合 Struct Array 的设计初衷。关于 CoVLA 数据集的更多信息,可以参考 CoVLA 数据集官网。
步骤 1:将数据级映射到 Collection Schema
CoVLA 数据集是一个大规模、多模态的驾驶数据集,包含 10000 个视频片段,总时长超过 80 小时。它以 20Hz 的帧率采样,并为每一帧标注详细的自然语言描述,以及车辆状态信息和检测到的物体的坐标。
该数据集的数据结构如下:
├── video_1                                       (VIDEO) # video.mp4
│   ├── video_id                                  (INT)
│   ├── video_url                                 (STRING)
│   ├── frames                                    (ARRAY)
│   │   ├── frame_1                               (STRUCT)
│   │   │   ├── caption                           (STRUCT) # captions.jsonl
│   │   │   │   ├── plain_caption                 (STRING)
│   │   │   │   ├── rich_caption                  (STRING)
│   │   │   │   ├── risk                          (STRING)
│   │   │   │   ├── risk_correct                  (BOOL)
│   │   │   │   ├── risk_yes_rate                 (FLOAT)
│   │   │   │   ├── weather                       (STRING)
│   │   │   │   ├── weather_rate                  (FLOAT)
│   │   │   │   ├── road                          (STRING)
│   │   │   │   ├── road_rate                     (FLOAT)
│   │   │   │   ├── is_tunnel                     (BOOL)
│   │   │   │   ├── is_tunnel_yes_rate            (FLOAT)
│   │   │   │   ├── is_highway                    (BOOL)
│   │   │   │   ├── is_highway_yes_rate           (FLOAT)
│   │   │   │   ├── has_pedestrain                (BOOL)
│   │   │   │   ├── has_pedestrain_yes_rate       (FLOAT)
│   │   │   │   ├── has_carrier_car               (BOOL)
│   │   │   ├── traffic_light                     (STRUCT) # traffic_lights.jsonl
│   │   │   │   ├── index                         (INT)
│   │   │   │   ├── class                         (STRING)
│   │   │   │   ├── bbox                          (LIST<FLOAT>)
│   │   │   ├── front_car                         (STRUCT) # front_cars.jsonl
│   │   │   │   ├── has_lead                      (BOOL)
│   │   │   │   ├── lead_prob                     (FLOAT)
│   │   │   │   ├── lead_x                        (FLOAT)
│   │   │   │   ├── lead_y                        (FLOAT)
│   │   │   │   ├── lead_speed_kmh                (FLOAT)
│   │   │   │   ├── lead_a                        (FLOAT)
│   │   ├── frame_2                               (STRUCT)
│   │   ├── ...                                   (STRUCT)
│   │   ├── frame_n                               (STRUCT)
├── video_2
├── ...
├── video_n
您会发现 CoVLA 数据集的结构非常复杂,层级较多。收集到的数据分成了多个 .jsonl 文件与原始视频片段(.mp4)一起存放在数据集中。
在 Zilliz Cloud 中,您可以使用 JSON 字段或者 Struct Array 字段来处理多层嵌套结构。当内层嵌套结构中包含向量字段时,Struct Array 成为了唯一选择。但是,Struct Array 字段内的 Struct 并不支持 JSON 或 Array 字段。为了将 CoVLA 数据集存入 Collection,您需要移除不必要的嵌套层级。
下图展示了最终的建模结果:
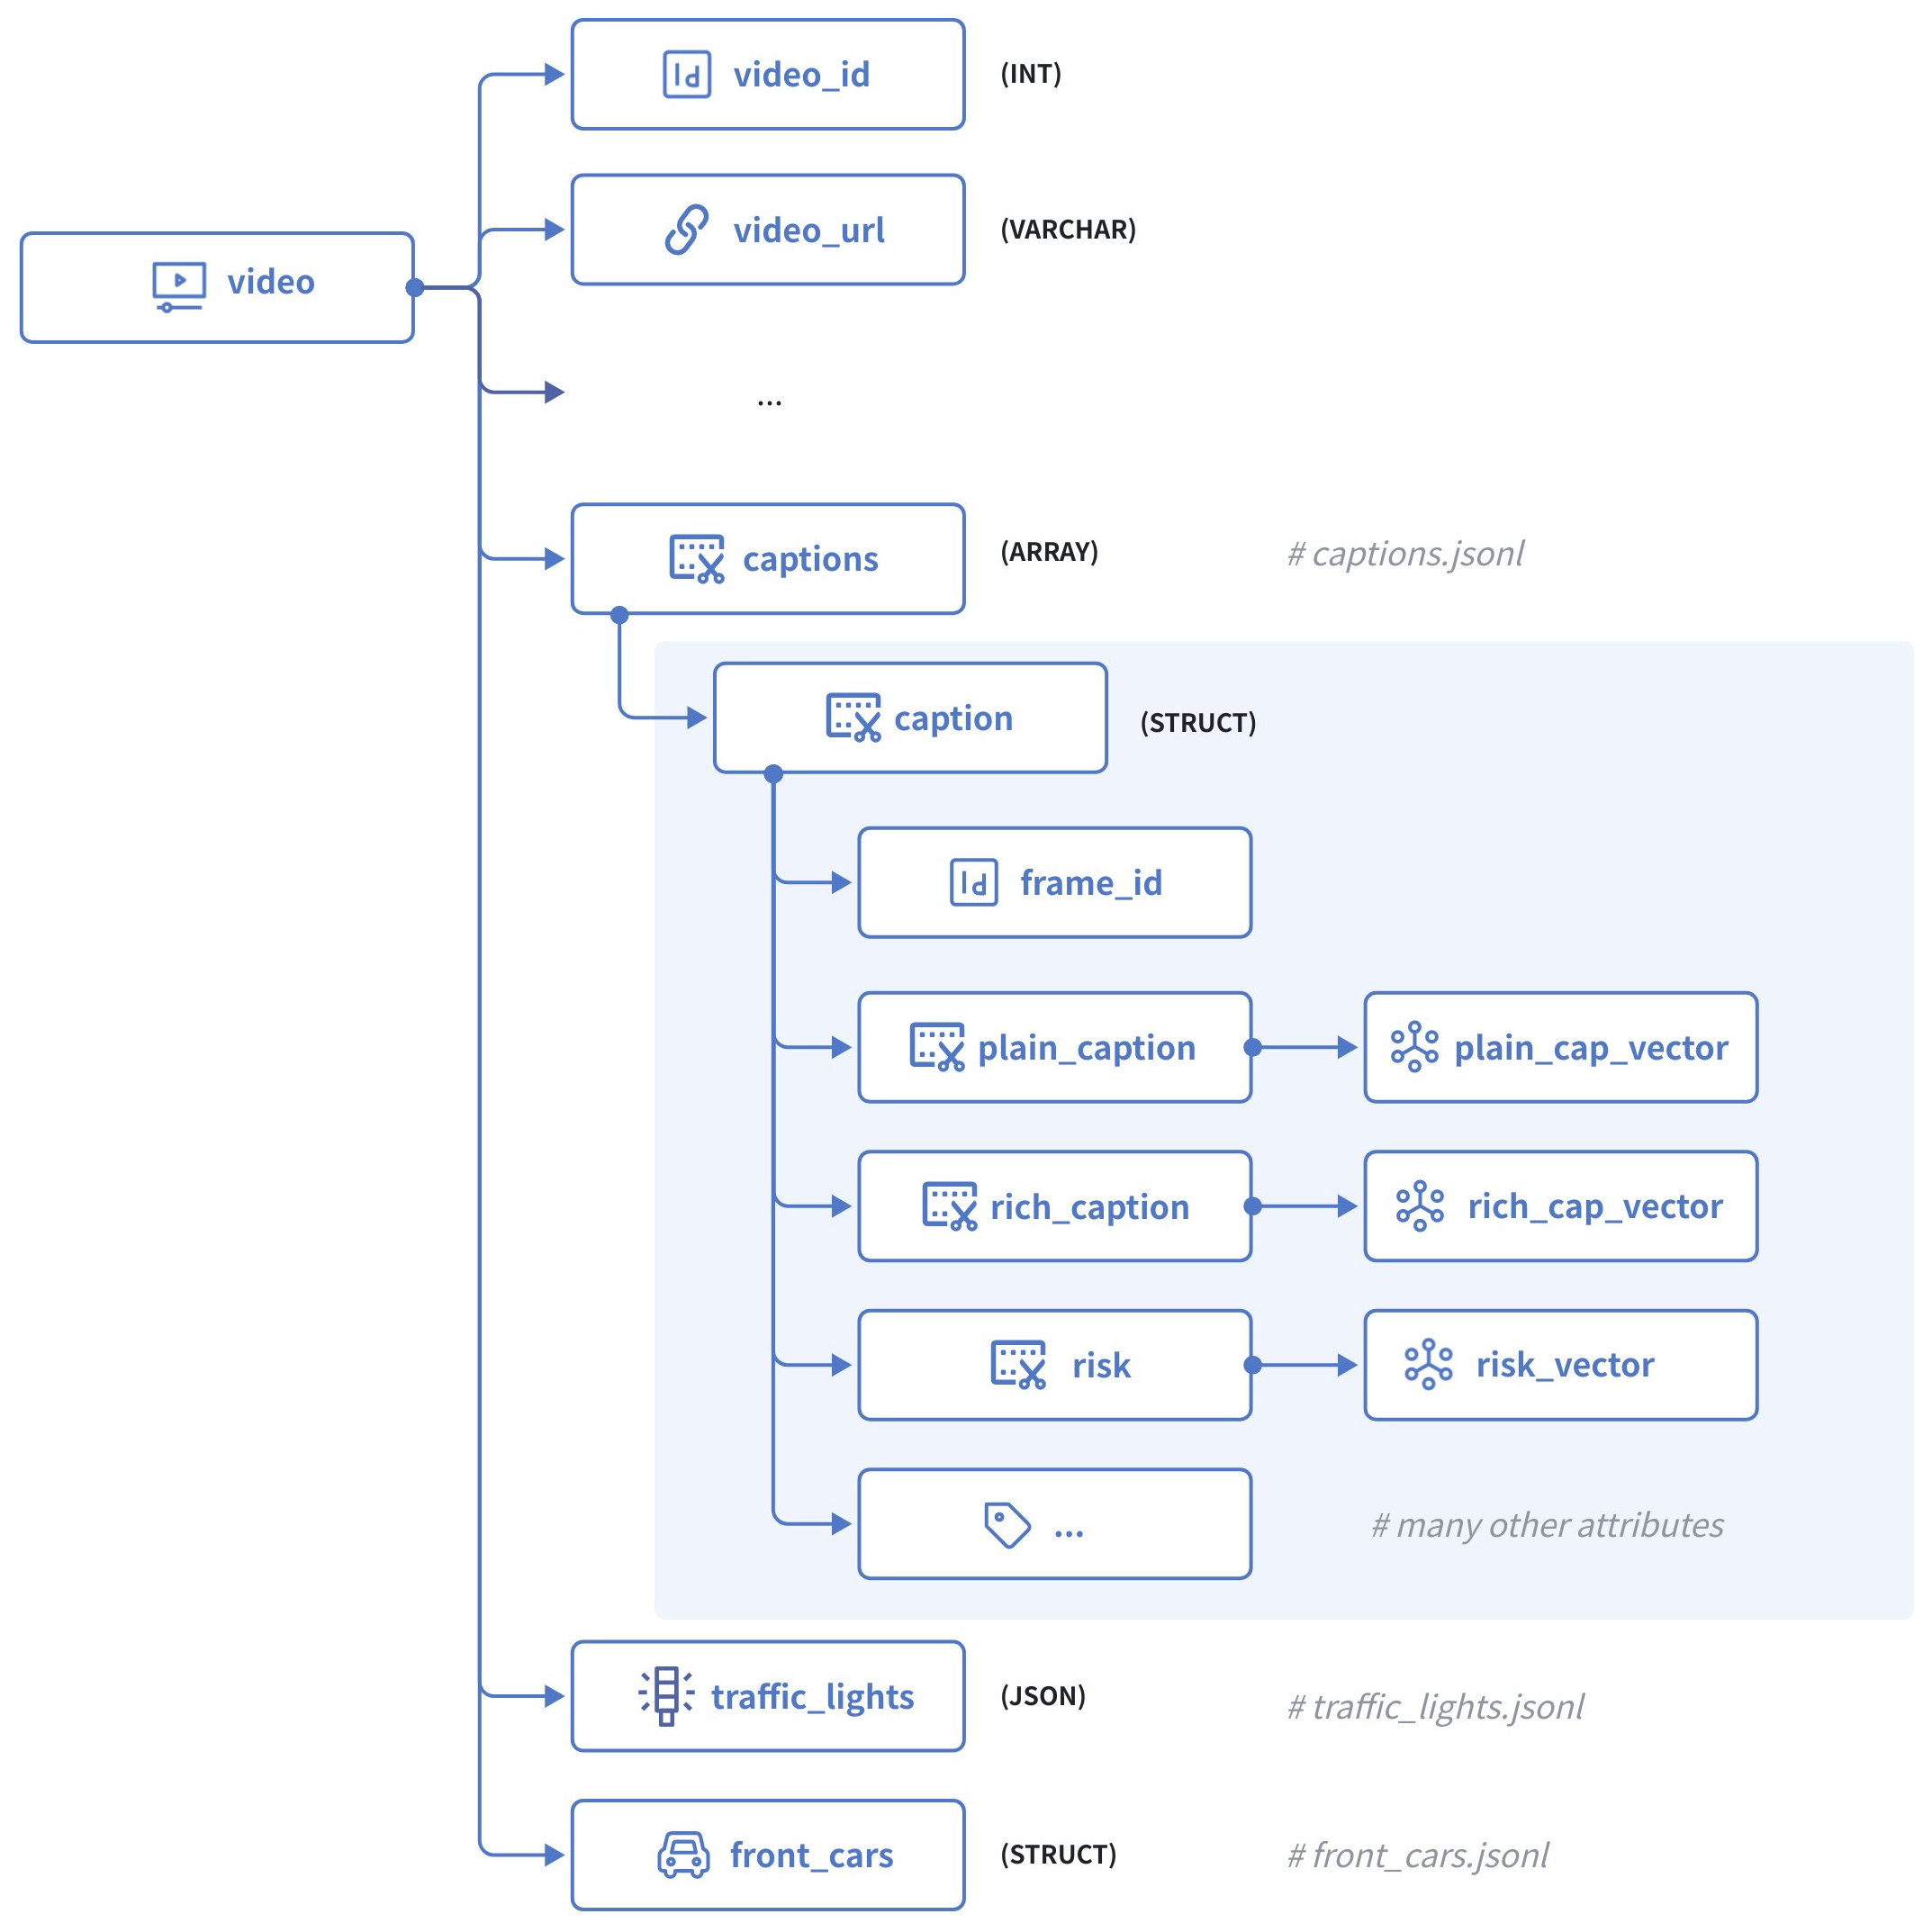
在上图中,每个视频片段都包含如下字段:
-
video_id作为主键,接受 INT64 类型的整数。 -
states是一个原始 JSON 字段,其中包含当前视频每一帧中的自车状态。 -
captions是一个 Struct Array,每个 Struct 包含以下字段:-
frame_id用于标识当前视频中的特定帧。 -
plain_caption是当前帧在不考虑环境因素(如天气、路况等)情况下的描述,而plain_cap_vector是其对应的向量嵌入。 -
rich_caption是对当前帧及其周围环境的描述,而rich_cap_vector是其对应的向量嵌入。 -
risk是对自车在当前帧中面临的风险的描述,risk_vector是其对应的向量嵌入。 -
帧的所有其他属性,如道路、天气、是否为隧道、是否有行人等。
-
-
traffic_lights是一个JSON 字段,包含当前帧中识别出的所有交通信号灯信号。 -
front_cars是另一个 Struct Array 字段,包含当前帧中识别出的所有前车的信息。
步骤 2:初始化 Schema
首先,我们需要创建 captions Struct、front_cars Struct、以及 Collection 的 Schema。
-
初始化 captions Struct Schema
client = MilvusClient("https://{cluster-id}.{region}.vectordb.zilliz.com.cn:19530")# create the schema for the caption structschema_for_caption = client.create_struct_field_schema()schema_for_caption.add_field(field_name="frame_id",datatype=DataType.INT64,description="ID of the frame to which the ego vehicle's behavior belongs")schema_for_caption.add_field(field_name="plain_caption",datatype=DataType.VARCHAR,max_length=1024,description="plain description of the ego vehicle's behaviors")schema_for_caption.add_field(field_name="plain_cap_vector",datatype=DataType.FLOAT_VECTOR,dim=768,description="vectors for the plain description of the ego vehicle's behaviors")schema_for_caption.add_field(field_name="rich_caption",datatype=DataType.VARCHAR,max_length=1024,description="rich description of the ego vehicle's behaviors")schema_for_caption.add_field(field_name="rich_cap_vector",datatype=DataType.FLOAT_VECTOR,dim=768,description="vectors for the rich description of the ego vehicle's behaviors")schema_for_caption.add_field(field_name="risk",datatype=DataType.VARCHAR,max_length=1024,description="description of the ego vehicle's risks")schema_for_caption.add_field(field_name="risk_vector",datatype=DataType.FLOAT_VECTOR,dim=768,description="vectors for the description of the ego vehicle's risks")schema_for_caption.add_field(field_name="risk_correct",datatype=DataType.BOOL,description="whether the risk assessment is correct")schema_for_caption.add_field(field_name="risk_yes_rate",datatype=DataType.FLOAT,description="probability/confidence of risk being present")schema_for_caption.add_field(field_name="weather",datatype=DataType.VARCHAR,max_length=50,description="weather condition")schema_for_caption.add_field(field_name="weather_rate",datatype=DataType.FLOAT,description="probability/confidence of the weather condition")schema_for_caption.add_field(field_name="road",datatype=DataType.VARCHAR,max_length=50,description="road type")schema_for_caption.add_field(field_name="road_rate",datatype=DataType.FLOAT,description="probability/confidence of the road type")schema_for_caption.add_field(field_name="is_tunnel",datatype=DataType.BOOL,description="whether the road is a tunnel")schema_for_caption.add_field(field_name="is_tunnel_yes_rate",datatype=DataType.FLOAT,description="probability/confidence of the road being a tunnel")schema_for_caption.add_field(field_name="is_highway",datatype=DataType.BOOL,description="whether the road is a highway")schema_for_caption.add_field(field_name="is_highway_yes_rate",datatype=DataType.FLOAT,description="probability/confidence of the road being a highway")schema_for_caption.add_field(field_name="has_pedestrian",datatype=DataType.BOOL,description="whether there is a pedestrian present")schema_for_caption.add_field(field_name="has_pedestrian_yes_rate",datatype=DataType.FLOAT,description="probability/confidence of pedestrian presence")schema_for_caption.add_field(field_name="has_carrier_car",datatype=DataType.BOOL,description="whether there is a carrier car present") -
初始化 front_cars Struct Schema
📘说明虽然 front_car 对象并不包含向量,但是因为数据体积超过 JSON 字段的上限,你仍然需要将其作为 Struct Array 引入。
schema_for_front_car = client.create_struct_field_schema()schema_for_front_car.add_field(field_name="frame_id",datatype=DataType.INT64,description="ID of the frame to which the ego vehicle's behavior belongs")schema_for_front_car.add_field(field_name="has_lead",datatype=DataType.BOOL,description="whether there is a leading vehicle")schema_for_front_car.add_field(field_name="lead_prob",datatype=DataType.FLOAT,description="probability/confidence of the leading vehicle's presence")schema_for_front_car.add_field(field_name="lead_x",datatype=DataType.FLOAT,description="x position of the leading vehicle relative to the ego vehicle")schema_for_front_car.add_field(field_name="lead_y",datatype=DataType.FLOAT,description="y position of the leading vehicle relative to the ego vehicle")schema_for_front_car.add_field(field_name="lead_speed_kmh",datatype=DataType.FLOAT,description="speed of the leading vehicle in km/h")schema_for_front_car.add_field(field_name="lead_a",datatype=DataType.FLOAT,description="acceleration of the leading vehicle") -
初始化 Collection Schema
schema = client.create_schema()schema.add_field(field_name="video_id",datatype=DataType.VARCHAR,description="primary key",max_length=16,is_primary=True,auto_id=False)schema.add_field(field_name="video_url",datatype=DataType.VARCHAR,max_length=512,description="URL of the video")schema.add_field(field_name="captions",datatype=DataType.ARRAY,element_type=DataType.STRUCT,struct_schema=schema_for_caption,max_capacity=600,description="captions for the current video")schema.add_field(field_name="traffic_lights",datatype=DataType.JSON,description="frame-specific traffic lights identified in the current video")schema.add_field(field_name="front_cars",datatype=DataType.ARRAY,element_type=DataType.STRUCT,struct_schema=schema_for_front_car,max_capacity=600,description="frame-specific leading cars identified in the current video")
步骤 3:配置索引参数
所有的向量字段都需要索引。为 Struct Array 字段中的向量字段创建索引,需要使用 AUTOINDEX 为索引类型,并在 MAX_SIM 系列相似度类型中选择合适的类型来度量 EmbeddingList 之间的相似度。
index_params = client.prepare_index_params()

index_params.add_index(
    field_name="captions[plain_cap_vector]",
    index_type="AUTOINDEX",
    metric_type="MAX_SIM_COSINE",
    index_name="captions_plain_cap_vector_idx", # mandatory for now
    index_params={"M": 16, "efConstruction": 200}
)

index_params.add_index(
    field_name="captions[rich_cap_vector]",
    index_type="AUTOINDEX",
    metric_type="MAX_SIM_COSINE",
    index_name="captions_rich_cap_vector_idx", # mandatory for now
    index_params={"M": 16, "efConstruction": 200}
)

index_params.add_index(
    field_name="captions[risk_vector]",
    index_type="AUTOINDEX",
    metric_type="MAX_SIM_COSINE",
    index_name="captions_risk_vector_idx", # mandatory for now
    index_params={"M": 16, "efConstruction": 200}
)
建议您为 JSON 类型的字段启用 JSON Shredding 来加速过滤。
步骤 4:创建 Collection
当 Schema 和索引参数都准备好之后,就可以使用它们来创建 Collection 了。
client.create_collection(
    collection_name="covla_dataset",
    schema=schema,
    index_params=index_params
)
步骤 5:插入数据
Turing Motors 将 CoVLA 数据集分散到多个文件中,包括原始视频片段(.mp4)、自车状态(states.jsonl)、场景描述(captions.jsonl)、交通信息灯(traffic_lights.jsonl)以及前方车辆信息(front_cars.jsonl)。
您需要从这些数据中将每个视频片段的信息抽取出来按之前创建好的 Schema 的格式重新组合才能将其插入到 Collection 中。下方示例代码演示了合并指定视频片段所有数据的代码。
import json
from openai import OpenAI

openai_client = OpenAI(
    api_key='YOUR_OPENAI_API_KEY',
)

video_id = "0a0fc7a5db365174" # represent a single video with 600 frames

# get all front car records in the specified video clip
entries = []
front_cars = []
with open('data/front_car/{}.jsonl'.format(video_id), 'r') as f:
    for line in f:
        entries.append(json.loads(line))

for entry in entries:
    for key, value in entry.items():
        value['frame_id'] = int(key)
        front_cars.append(value)

# get all traffic lights identified in the specified video clip
entries = []
traffic_lights = []
frame_id = 0
with open('data/traffic_lights/{}.jsonl'.format(video_id), 'r') as f:
    for line in f:
        entries.append(json.loads(line))

for entry in entries:
    for key, value in entry.items():
        if not value or (value['index'] == 1 and key != '0'):
            frame_id+=1

        if value:
            value['frame_id'] = frame_id
            traffic_lights.append(value)
        else:
            value_dict = {}
            value_dict['frame_id'] = frame_id
            traffic_lights.append(value_dict)

# get all captions generated in the video clip and convert them into vector embeddings
entries = []
captions = []
with open('data/captions/{}.jsonl'.format(video_id), 'r') as f:
    for line in f:
        entries.append(json.loads(line))

def get_embedding(text, model="embeddinggemma:latest"):
    response = openai_client.embeddings.create(input=text, model=model)
    return response.data[0].embedding

# Add embeddings to each entry
for entry in entries:
    # Each entry is a dict with a single key (e.g., '0', '1', ...)
    for key, value in entry.items():
        value['frame_id'] = int(key)  # Convert key to integer and assign to frame_id

        if "plain_caption" in value and value["plain_caption"]:
            value["plain_cap_vector"] = get_embedding(value["plain_caption"])
        if "rich_caption" in value and value["rich_caption"]:
            value["rich_cap_vector"] = get_embedding(value["rich_caption"])
        if "risk" in value and value["risk"]:
            value["risk_vector"] = get_embedding(value["risk"])

        captions.append(value)

data = {
    "video_id": video_id,
    "video_url": "https://your-storage.com/{}".format(video_id),
    "captions": captions,
    "traffic_lights": traffic_lights,
    "front_cars": front_cars
}
在经过上述方式的处理后,您就可以向 Collection 中插入这条视频片段的相关数据了。
client.insert(
    collection_name="covla_dataset",
    data=[data]
)

# {'insert_count': 1, 'ids': ['0a0fc7a5db365174'], 'cost': 0}