与 PyTorch 集成搭建图片搜索系统
在本文中,我们将演示如何使用 Zilliz Cloud 搭建一个简单的图片搜索系统。该系统使用的数据集是 Kaggle 上提供的印象派大师分类器数据集( Impressionist-Classifier Dataset )。在本示例中,我们将该数据库重新托管到了一个公共的 Google Drive 中。
本示例需要使用一个 1 CU 的 Zilliz Cloud Cluster,并使用 PyTorch 的预训练 ResNet50 模型获取指定图片的向量表示。
现在,让我们开始吧!
准备工作
本页中的脚本需要使用 pymilvus 连接 Zilliz Cloud,使用 torch 运行 Embedding 模型,使用 torchvision 调用模型并对图片进行预处理,使用 gdown 下载示例数据集,使用 tqdm 在命令行中显示进度条。我们可以运行如下命令安装这些依赖。
pip install pymilvus torch gdown torchvision tqdm
准备数据
首先,我们需要使用 gdown 从公共 Google Drive 中获取压缩文件,并使用 Python 自带的 zipfile 包将其解压。
import gdown
import zipfile

url = 'https://drive.google.com/uc?id=1OYDHLEy992qu5C4C8HV5uDIkOWRTAR1_'
output = './paintings.zip'
gdown.download(url, output)

with zipfile.ZipFile("./paintings.zip","r") as zip_ref:
    zip_ref.extractall("./paintings")
数据集大小为 2.35 GB , 下载耗时取决于您的网络状况。
主要参数
为了更�好的管理脚本,我们将一些主要的公共参数提取出来列在下方。你可以根据需要修改这些参数。
# 1. Set up the name of the collection to be created.
COLLECTION_NAME = 'image_search_db'

# 2. Set up the dimension of the embeddings.
DIMENSION = 2048

# 3. Set the inference parameters
BATCH_SIZE = 128
TOP_K = 3

# 4. Set up the connection parameters for your Zilliz Cloud cluster.
URI = 'YOUR_CLUSTER_ENDPOINT'
TOKEN = 'YOUR_CLUSTER_TOKEN'
设置 Zilliz Cloud
在这一小节,我们将完成 Zilliz Cloud 的设置,涉及如下步骤:
-
使用提供的端点 URI 连接 Zilliz Cloud cluster。
from pymilvus import connections

# Connect to Zilliz Cloud and create a collection
connections.connect(
    alias='default',
    # Public endpoint obtained from Zilliz Cloud
    uri=URI,
    token=TOKEN
) -
如果需要创建的 Collection 已存在,删除该 Collection。
from pymilvus import utility

# Remove any previous collections with the same name
if COLLECTION_NAME in utility.list_collections():
utility.drop_collection(COLLECTION_NAME) -
创建一个 Collection 用于存储图片 ID,图片路径以及该图片的向量表示。
from pymilvus import FieldSchema, CollectionSchema, DataType, Collection

fields = [
    FieldSchema(name='id', dtype=DataType.INT64, is_primary=True, auto_id=True),
    FieldSchema(name='filepath', dtype=DataType.VARCHAR, max_length=200),  # VARCHARS need a maximum length, so for this example they are set to 200 characters
    FieldSchema(name='image_embedding', dtype=DataType.FLOAT_VECTOR, dim=DIMENSION)
]

schema = CollectionSchema(fields=fields)

collection = Collection(
    name=COLLECTION_NAME,
    schema=schema,
) -
为 Collection 创建索引文件,并将 Collection 加载到内存。
index_params = {
    'index_type': 'AUTOINDEX',
    'metric_type': 'L2',
    'params': {}
}

collection.create_index(
    field_name='image_embedding',
    index_params=index_params
)

collection.load()
在完成上述步骤后,我们就可以向 Collection 中插入数据了。在创建索引文件后插入的任何数据都会被自动索引并可被立即用于搜索。如果数据正在索引过程中,Zilliz Cloud 会使用暴力搜索模式,所以搜索过程可能会比较慢。
插入数据
在本示例中,我们将使用 torch 包中的 ResNet50 模型。为了获取指定图片的向量表示,我们将移除模型的最后一个分类层。这样一来,经过模型获取的向量维度均为2048。下列代码块中,我们使用了 torch 包中所有模型均会使用相同的预处理方法。
在下列步骤中,我们将会:
-
加载数据。
import glob

# Get the filepaths of the images
paths = glob.glob('./paintings/paintings/**/*.jpg', recursive=True)
len(paths)

# Output
#
# 4978 -
预处理数据,将其分为不同的批次。
import torch

# 加载 Embedding 模型,并移除模型的最后一层。
model = torch.hub.load('pytorch/vision:v0.10.0', 'resnet50', pretrained=True)
model = torch.nn.Sequential(*(list(model.children())[:-1]))
model.eval() -
获取数据的向量表示。
from torchvision import transforms

# 对图片进行预处理。
preprocess = transforms.Compose([
    transforms.Resize(256),
    transforms.CenterCrop(224),
    transforms.ToTensor(),
    transforms.Normalize(mean=[0.485, 0.456, 0.406], std=[0.229, 0.224, 0.225]),
]) -
向 Collection 插入数据。
from PIL import Image
from tqdm import tqdm

# Embed function that embeds the batch and inserts it
def embed(data):
    with torch.no_grad():
        output = model(torch.stack(data[0])).squeeze()
        collection.insert([data[1], output.tolist()])

data_batch = [[],[]]

# Read the images into batches for embedding and insertion
for path in tqdm(paths):
    im = Image.open(path).convert('RGB')
    data_batch[0].append(preprocess(im))
    data_batch[1].append(path)
    if len(data_batch[0]) % BATCH_SIZE == 0:
        embed(data_batch)
        data_batch = [[],[]]

# Embed and insert the remainder
if len(data_batch[0]) != 0:
    embed(data_batch)

# Call a flush to index any unsealed segments.
time.sleep(5)
由于获取图片的向量表示耗时较长,本步骤相对比较耗时。可以喝点咖啡,稍事休息。
PyTorch 可能与 Python 3.9 及之前版本存在不兼容的问题。建议使用 Python 3.10 及之后版本。
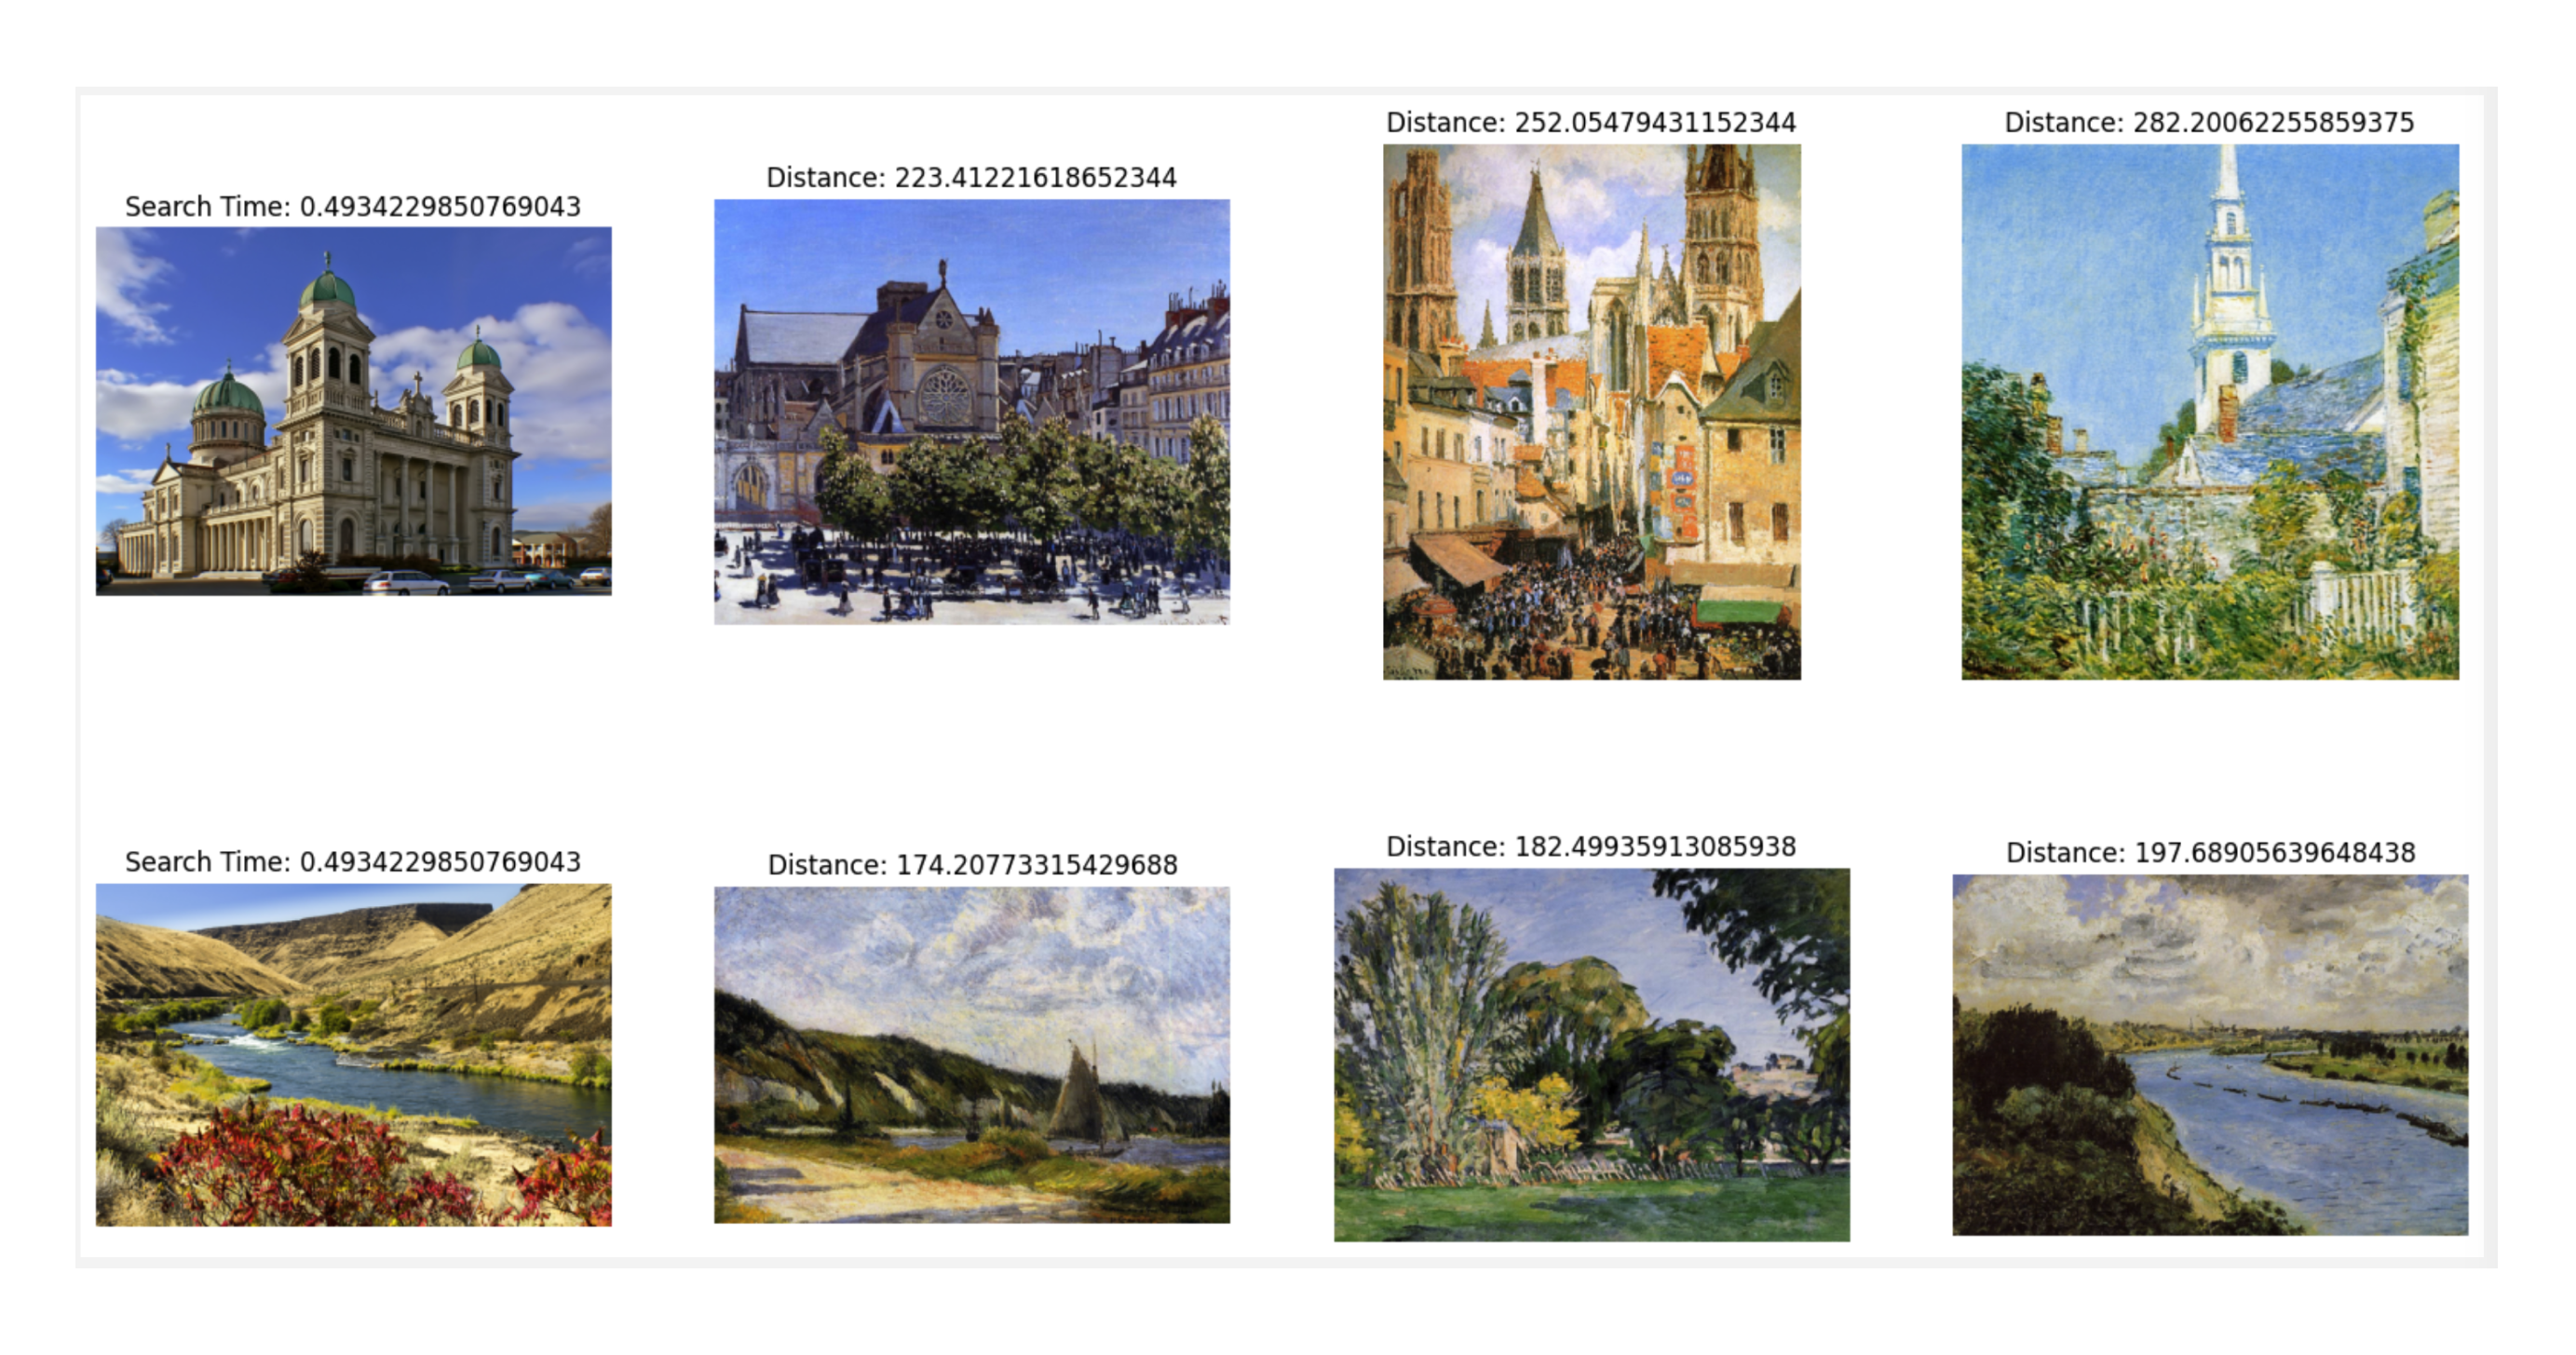
执行搜索
在向 Zilliz Cloud 插入所有数据后,我们就可以开始执行搜索了。在本示例中,我们将使用两张示例图片执行相似性搜索。由于代码中执行的是批量搜索,因此搜索时间是指完成同一批次中所有图片的相似性搜索的时间。
import glob

# Get the filepaths of the search images
search_paths = glob.glob('./paintings/test_paintings/**/*.jpg', recursive=True)
print(len(search_paths))

# Output
#
# 2

import time
from matplotlib import pyplot as plt

# Embed the search images
def embed(data):
    with torch.no_grad():
        ret = model(torch.stack(data))
        # If more than one image, use squeeze
        if len(ret) > 1:
            return ret.squeeze().tolist()
        # Squeeze would remove batch for single image, so using flatten
        else:
            return torch.flatten(ret, start_dim=1).tolist()

data_batch = [[],[]]

for path in search_paths:
    im = Image.open(path).convert('RGB')
    data_batch[0].append(preprocess(im))
    data_batch[1].append(path)

embeds = embed(data_batch[0])
start = time.time()
res = collection.search(embeds, anns_field='image_embedding', param={}, limit=TOP_K, output_fields=['filepath'])
finish = time.time()

# Show the image results
f, axarr = plt.subplots(len(data_batch[1]), TOP_K + 1, figsize=(20, 10), squeeze=False)

for hits_i, hits in enumerate(res):
    axarr[hits_i][0].imshow(Image.open(data_batch[1][hits_i]))
    axarr[hits_i][0].set_axis_off()
    axarr[hits_i][0].set_title('Search Time: ' + str(finish - start))
    for hit_i, hit in enumerate(hits):
        axarr[hits_i][hit_i + 1].imshow(Image.open(hit.entity.get('filepath')))
        axarr[hits_i][hit_i + 1].set_axis_off()
        axarr[hits_i][hit_i + 1].set_title('Distance: ' + str(hit.distance))

# Save the search result in a separate image file alongside your script.
plt.savefig('search_result.png')
本示例的搜索结果如下。